AP 如何在獨立模式下新增 SSID
選項
Zyxel小編 Corey
文章數: 217  Zyxel Employee


 Zyxel Employee


以下教學向各位說明如何在獨立模式下新增 SSID。
* 注意:請將下面的範例替換為您的實際設定。此範例使用的設備為 NWA210AX(韌體版本:V6.30(ABTD.3))。
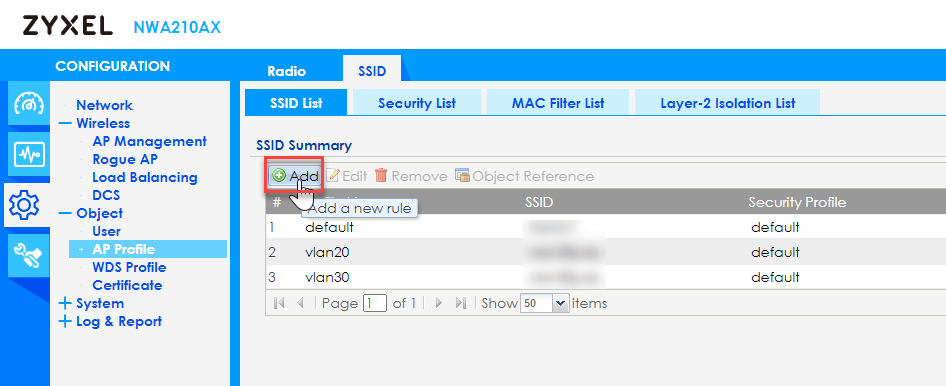
1. 前往 Configuration >> Object >> AP profile >> SSID
點擊 "Add" 新增一個新的 SSID-Profile

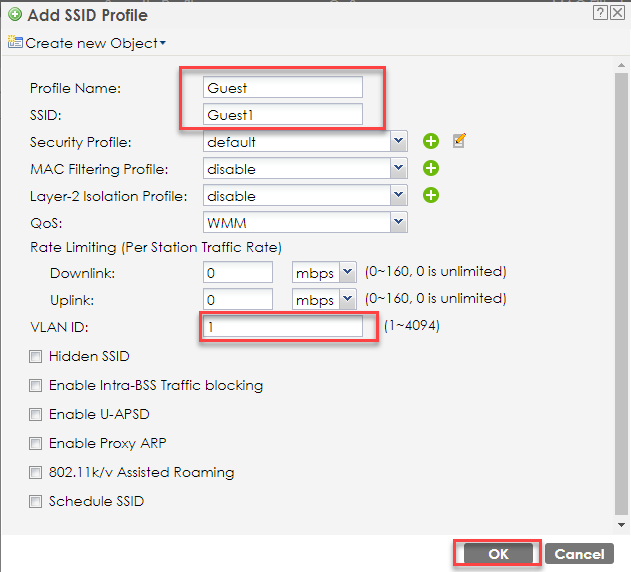
2. 依據您的網路環境設定 SSID 與 VLAN ID

3. 若希望連接 SSID 需要經過安全性驗證,請新增 “Security profile” 。
(預設值 deafult 不驗證使用者裝置)

4. 新增 Security Profile 並依照您的需求配置密碼

5. 將新增的 Security Profile 套用到此 SSID.

6. 前往 Configuration >> Wireless >> AP Management
將新增的 SSID 套用到 Radio 1(2.4G訊號) 、Radio 2(5G訊號)
* 注意:請將下面的範例替換為您的實際設定。此範例使用的設備為 NWA210AX(韌體版本:V6.30(ABTD.3))。
1. 前往 Configuration >> Object >> AP profile >> SSID
點擊 "Add" 新增一個新的 SSID-Profile

2. 依據您的網路環境設定 SSID 與 VLAN ID

3. 若希望連接 SSID 需要經過安全性驗證,請新增 “Security profile” 。
(預設值 deafult 不驗證使用者裝置)

4. 新增 Security Profile 並依照您的需求配置密碼

5. 將新增的 Security Profile 套用到此 SSID.

6. 前往 Configuration >> Wireless >> AP Management
將新增的 SSID 套用到 Radio 1(2.4G訊號) 、Radio 2(5G訊號)
即可使用設定的密碼成功連上新增的 SSID


0


