How to Configure SSL VPN Access Profile

 Zyxel Employee


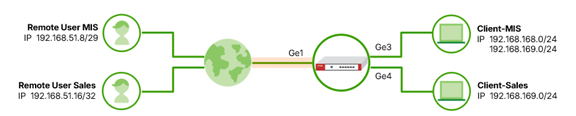
With multiple SSL VPN client profiles, you can create one or more profiles to apply its own settings such as IP pool, DNS and tunnel type to specific users. This example illustrates how to create multiple SSL VPN client profiles for different groups.
Note: This feature is supported from firmware version uOS 1.38.
Add Client Profiles
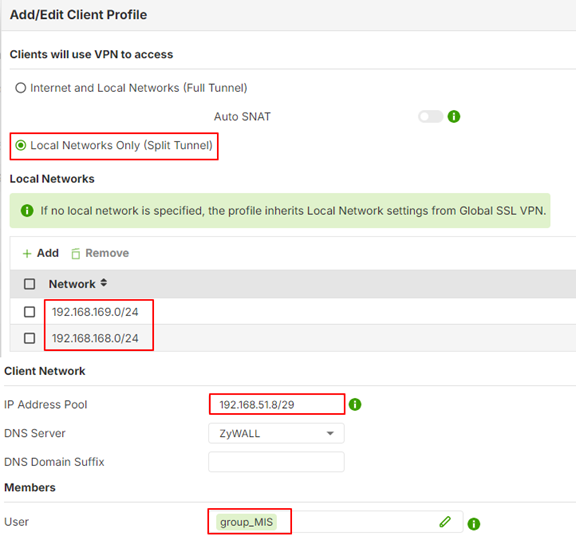
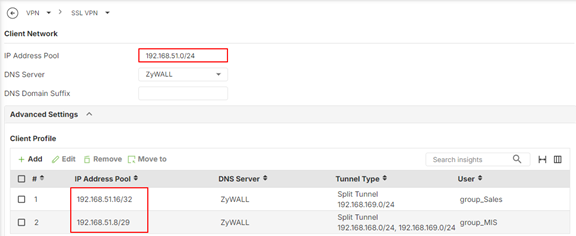
- Go to VPN > SSL VPN > Advanced Settings > Client Profile and click +Add to add a client profile for MIS. In this example, users in group_MIS can access the network 192.168.168.0/24 and 168.168.169.0/24 after establishing SSL VPN.
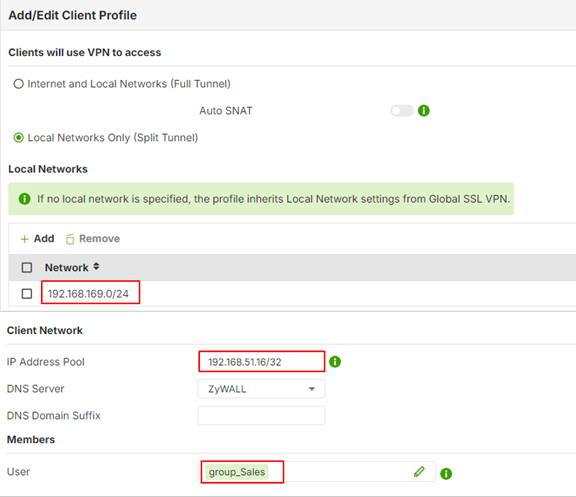
2. Add another Client Profile for Sales. In this example, users in group_Sales can access the network 168.168.169.0/24 only after establishing SSL VPN.
3. Check the client profiles.
- The IP Address Pool of a client profile must be within the global SSL VPN IP Address Pool range. In this example, the global IP address Pool is 192.168.51.0/24, and the IP address Pool of client profiles are 192.168.51.16/29 and 192.168.51.8/29.
- The IP Address Pool of a client profile should be an IPv4 CIDR notation. For example,
- 192.168.51.8/29 for IP range 192.168.51.8 ~ 192.168.51.15
- 192.168.51.16/32 for single IP 192.168.51.16
Verification
- Go to VPN > SSL VPN. Download SSL VPN configuration file and import the file to OpenVPN client.
- Enter the username “MIS1” and the password to connect SSL VPN. The user “MIS1” receives the IP address 192.168.51.10 and can access both 192.168.168.0/24 and 192.168.169.0/24.
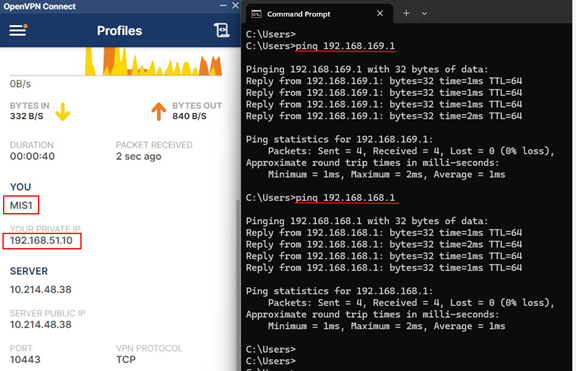
Verify the SSL VPN status in Log & Report > System.

3. Enter the username “sales1” and the password to connect SSL VPN. The user “sales1” receives the IP address 192.168.51.16 and can access 192.168.169.0/24 only.
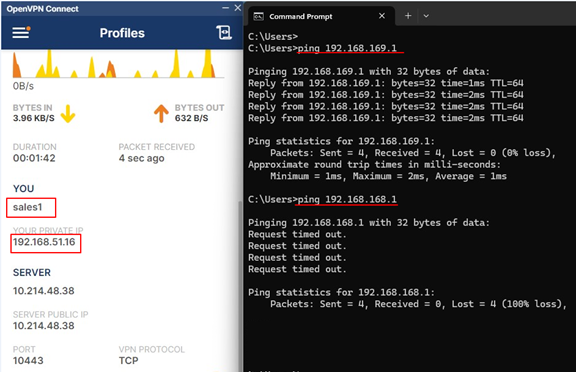
Verify the SSL VPN status in Log & Report > System.

Categories
- All Categories
- 442 Beta Program
- 3K Nebula
- 234 Nebula Ideas
- 6.7K Security
- 693 USG FLEX H Series
- 365 Security Ideas
- 1.8K Switch
- 87 Switch Ideas
- 1.4K Wireless
- 56 Wireless Ideas
- 7.1K Consumer Product
- 312 Service & License
- 508 News and Release
- 97 Security Advisories
- 31 Education Center
- 10 [Campaign] Zyxel Network Detective
- 5.1K FAQ
- 34 Documents
- 89 About Community
- 114 Security Highlight