How to configure the switch to prevent ARP spoofing
 Zyxel Employee


This example will instruct the administrator on how to configure the switch to protect the network from attackers using the same IP Addresses of core network components (ex. servers or gateways). ARP Spoofing is a type of attack that can cause either denial of services or an unwanted man-in-the-middle receiving sensitive information. IP Source Guard’s ARP Inspection forces all clients connected to access ports to use the IP addresses provided by the administrator’s dedicated DHCP server.
Note:
All network IP addresses and subnet masks are used as examples in this article. Please replace them with your actual network IP addresses and subnet masks. All UI displayed in this article are taken from the XGS4600 series switch.
1. Configuration in the Switch
1-1. Access the Switch’s Web GUI.
1-2. Configure DHCP Snooping.
Note:
DHCP Snooping must be enabled before configuring ARP Inspection.
1-3. Go to Advance Application > IP Source Guard > IPv4 Source Guard Setup > ARP Inspection > Configure. Check the Active box to globally enable ARP Inspection.
1-4. Go to Advance Application > IP Source Guard > IPv4 Source Guard Setup > ARP Inspection > Configure > Port. Set all access ports as untrusted ports. Ports to the USG or other network components should be trusted ports. Click Apply.
1-5. Go to Advance Application > IP Source Guard > IPv4 Source Guard Setup > ARP Inspection > Configure > VLAN. Input the Start VID and End VID. Make sure that the PVID of the access ports are included in this range. Click Apply.
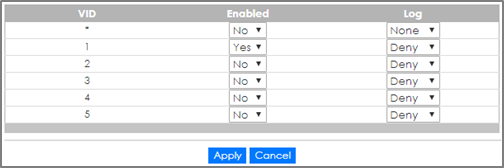
1-6. After inputting the VID range, a list of VID should appear below. Select Yes for the access ports’ VLAN. Click Apply.
2. Test the Result
2-1. Connect a device using dynamic IP address in one of the Switch’s access ports. This device should be able to communicate with the USG.
2-2. After the device has successfully received an IP address, access the Switch’s web GUI. Go to Advance Application > IP Source Guard > IPv4 Source. An entry should appear in the IP Source Guard Table.
2-3. Connect another device using a static IP address in one of the Switch’s other access port. In this example, the device will spoof the USG’s IP address “192.168.1.1”. This device will not be able to communicate with any other device across the Switch.
3. What Could Go Wrong
3-1. If the devices in the Local Network cannot reach the USG, Make sure that DHCP Snooping is configured on the Switch, first.
3-2. If the devices in the Local Network still cannot reach the USG after configuring and enabling DHCP Snooping, wait for a few minutes before attempting to reach the USG again. ARP Inspection sends the device’s MAC address into a filter table. This device must wait until the entry expires, indicated by the “Expiry (sec)” column.
3-3. If some of the devices are not able to reach the USG, the following problems may have occurred:
3-3-1. Make sure that the port connected to the USG or other internal devices are trusted ports.
3-3-2. Make sure that all the clients in the network renews their DHCP configurations incase the Switch has undergone reboot.
3-3-3. Make sure that the DHCP server’s pool has not run out of IP addresses.
Categories
- All Categories
- 442 Beta Program
- 2.9K Nebula
- 217 Nebula Ideas
- 127 Nebula Status and Incidents
- 6.5K Security
- 580 USG FLEX H Series
- 344 Security Ideas
- 1.7K Switch
- 84 Switch Ideas
- 1.4K Wireless
- 52 Wireless Ideas
- 7K Consumer Product
- 297 Service & License
- 476 News and Release
- 91 Security Advisories
- 31 Education Center
- 10 [Campaign] Zyxel Network Detective
- 4.8K FAQ
- 34 Documents
- 87 About Community
- 102 Security Highlight


