How to configure VRRP to provide hosts with a redundant gateway

 Zyxel Employee


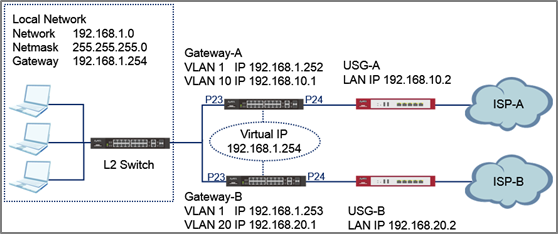
This example shows how to configure gateway redundancy. Virtual Router Redundancy Protocol (VRRP) is a feature that allows two gateways to use the same IP address. This allows hosts in the local network continues access to the Internet in the event of a failure on one of the gateways.
Note:
All network IP addresses and subnet masks are used as examples in this article. Please replace them with your actual network IP addresses and subnet masks. Only the GS/XGS/XS3700 Series Switch and XGS4600 Series Switch supports VRRP. The L2 Switch can be any Zyxel switch using default configurations.This example relies on two different Internet Service Providers (ISP) for Internet access. All UI displayed in this article are taken from the XGS4600 series switch.
1. Configuration in the Gateway-A
1-1. Access the Gateway-A’s web GUI. Go to Advance Application > VLAN > VLAN Configuration > Static VLAN Setup. Create/Edit VLAN 1 to make sure only Port 23 is a fixed port. Click Add.
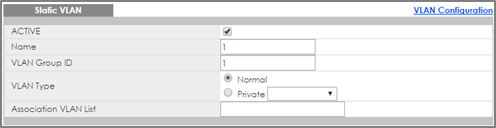

1-2. Go to Advance Application > VLAN > VLAN Configuration > Static VLAN Setup. Create/Edit VLAN 10 to make sure only Port 24 is a fixed port. Click Add.


1-3. Go to Advance Application > VLAN > VLAN Configuration > VLAN Port Setup. Configure port 24 with PVID 10. Click Apply.

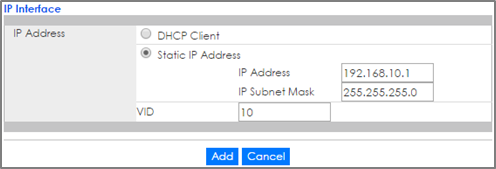
1-4. Go to Basic Setting > IP Setup. Configure the IP address for VLAN 1. Click Add and do the same for VLAN 10.

1-5. Go to Basic Setting > IP Setup. Configure the In-band Default Gateway. Click Apply.

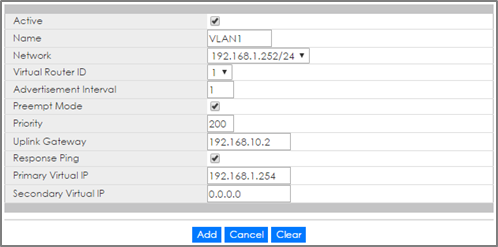
1-6. Go to IP Application > VRRP > Configuration. Enable VRRP for network “192.168.1.252/24”. Make sure that the priority is “200”. Click Add.
2. Configuration in the Gateway-B
2-1. Access the Gateway-B’s web GUI. Go to Advance Application > VLAN > VLAN Configuration > Static VLAN Setup. Create/Edit VLAN 1 to make sure only Port 23 is a fixed port. Click Add.


2-2. Go to Advance Application > VLAN > VLAN Configuration > Static VLAN Setup. Create/Edit VLAN 20 to make sure only Port 24 is a fixed port. Click Add.


2-3. Go to Advance Application > VLAN > VLAN Configuration > VLAN Port Setup. Configure port 24 with PVID 20. Click Apply.

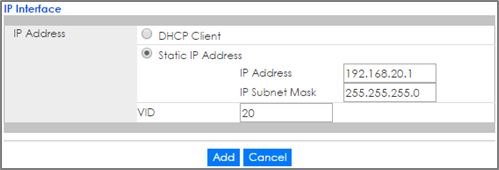
2-4. Go to Basic Setting > IP Setup. Configure the IP address for VLAN 1. Click Add and do the same for VLAN 20.

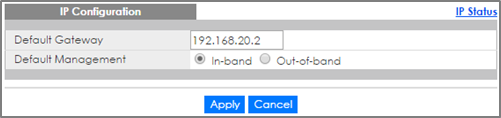
2-5. Go to Basic Setting > IP Setup. Configure the Default Gateway. Click Apply.
2-6. Go to IP Application > VRRP > Configuration. Enable VRRP for network “192.168.1.252/24”. Click Add.

3. Test the Result
3-1. Verify that Gateway-A is the Master VRRP Router. Go to IP Application > VRRP. VR Status should display Master.

3-2. Verify that Gateway-B is the Backup VRRP Router. Go to IP Application > VRRP. VR Status should display Backup.

3-3. Verify that Gateway-A and Gateway-B has a default route to their respective USG in Maintenance > Routing Table.


3-4. Configure the Host with a Static IP. The Host should be able to ping the virtual IP address 192.168.1.254.

3-5. Disconnect port 23 or port 24 of Gateway-A. Hosts should still be able to ping the virtual IP address 192.168.1.254.
4. What Could Go Wrong
4-1. If the hosts are not be able to access the Internet when Gateway-A has been disconnected from the network, the following problems may have occurred:
- Verify that the hosts and Gateway-B IP interface are in the same subnet and VLAN.
- Check for link failures on port 23 or port 24 of Gateway-B.
- Check whether Gateway-B has a default route to USG-B.
Categories
- All Categories
- 442 Beta Program
- 3K Nebula
- 234 Nebula Ideas
- 6.7K Security
- 691 USG FLEX H Series
- 365 Security Ideas
- 1.8K Switch
- 87 Switch Ideas
- 1.4K Wireless
- 56 Wireless Ideas
- 7.1K Consumer Product
- 312 Service & License
- 508 News and Release
- 97 Security Advisories
- 31 Education Center
- 10 [Campaign] Zyxel Network Detective
- 5.1K FAQ
- 34 Documents
- 89 About Community
- 114 Security Highlight