How to Deploy Device HA on USG FLEX H?

 Zyxel Employee


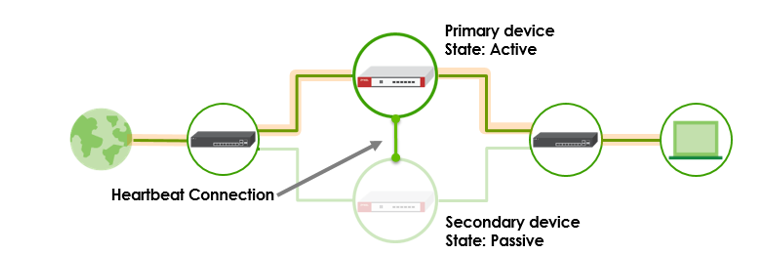
The Device HA feature acts as a failover when one of the devices in the network fails or can’t access the Internet. Device HA uses a dedicated heartbeat link between an active device and a passive device for status syncing and backup to the passive device. On the passive device, all ports are disabled except for the port with the heartbeat link. This example illustrates how to deploy the Device HA in your network.

Prerequisites for Device HA
The primary and secondary devices in Device HA mode must meet the following requirements:
- The same model - Both devices must be of the same hardware model. In this example, both devices must be USG FLEX 200H. You cannot set up Device HA between different models, USG FLEX 200H and USG FLEX 200HP.
- The same firmware version - Both devices must be running the same firmware version (uOS 1.31 or later versions).
- The same Organization on Nebula - Both devices must be registered to the same Organization on Nebula.
- Assign the primary USG FLEX H to the first site
- Assign the secondary USG FLEX H to the second site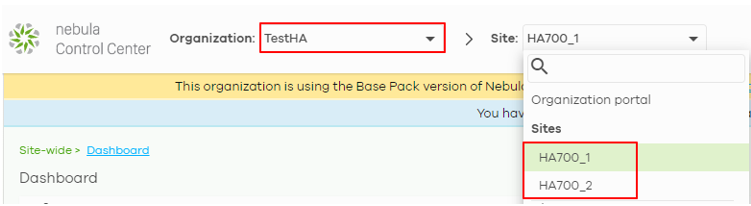
- Synchronization Port - The port 49058 is reserved for the Device HA synchronization. Users cannot modify this port or assign it to other services.
- WAN connection of the active device - Ensure that the active device has normal WAN connectivity to the internet and is connected to Nebula.

Configuration on the primary device
- Set up with your desired configuration and networking settings.
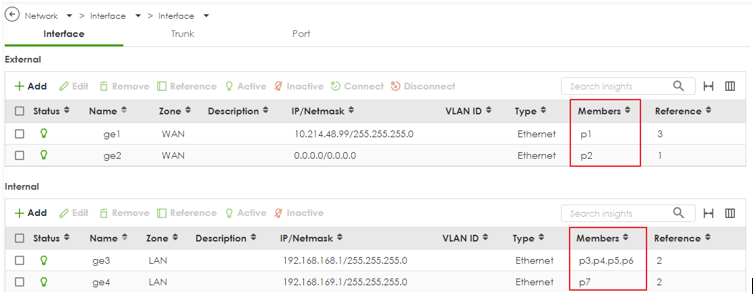
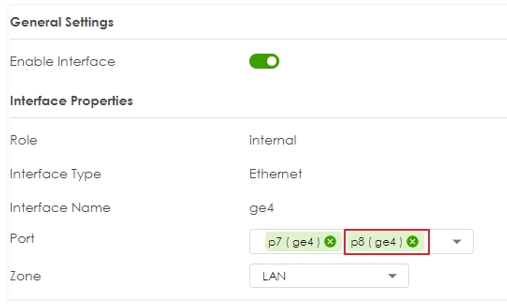
- The highest-numbered copper Ethernet port is reserved for heartbeat communication. Make sure the heartbeat port is not assigned to any interface. In this example, P8 is the heartbeat port on USG FLEX 200H. Remove P8 from interface ge4.
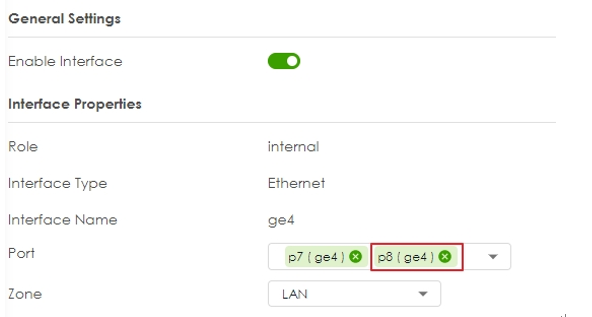

Go to Network > Interface and make sure p8 doesn’t belong to any interface.
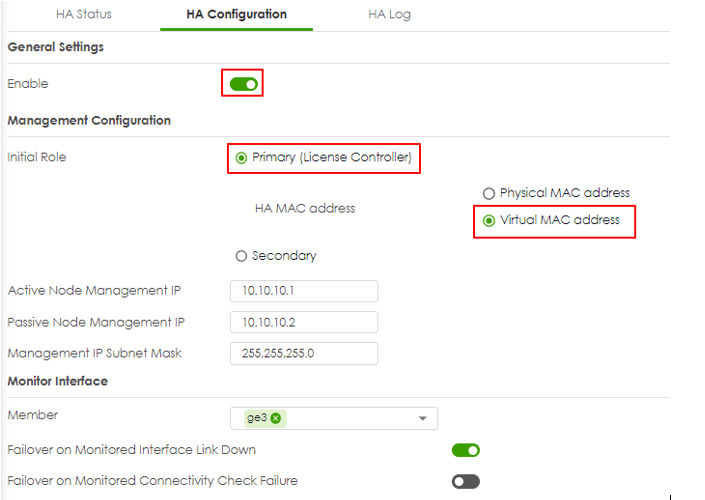
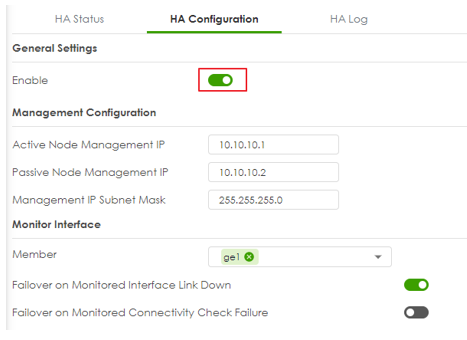
3. Go to System > Device HA > HA Configuration.
- Select Primary role.
- Select HA MAC address.
If Virtual MAC Address is selected, the MAC address of each interface will be replaced as follows.
D8:EC:E5:XX:XX:1D -> D6:EC:E5:XX:XX:1D
- Configure Management IP for active and passive role. The two management IPs must be different but in the same subnet.
- Select monitor interfaces. HA failover will be triggered when monitored interface is down. Turn on “Enable” to enable Device HA and Apply.
Configuration on the secondary device
- Make sure the secondary device is reset to default settings. Follow the wizard to register it to Nebula and it to the same organization as the primary device.
- After the secondary device is registered to Nebula successfully, remove wan connection from the secondary device and login to the device via lan interface to configure HA.
- Make sure the heartbeat port is not assigned to any interface. In this example, P8 is the heartbeat port on USG FLEX 200H. Remove P8 from interface ge4.
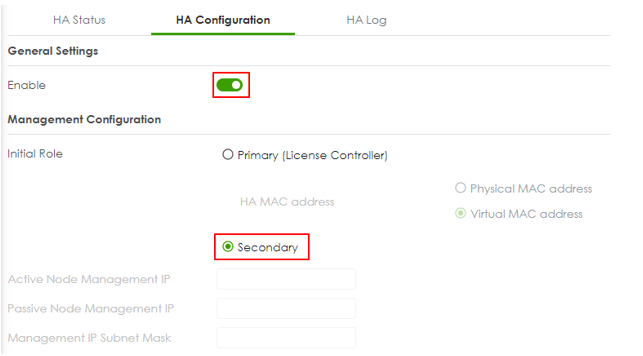
- Go to System > Device HA > HA Configuration. Select Secondary role. Turn on “Enable” to enable Device HA and Apply. Logout from the secondary device and unplug all Ethernet cables of wan and lan interfaces.
Connect the heartbeat ports
Connect the heartbeat ports of the primary and secondary device directly and avoid putting a device in between such as a switch.

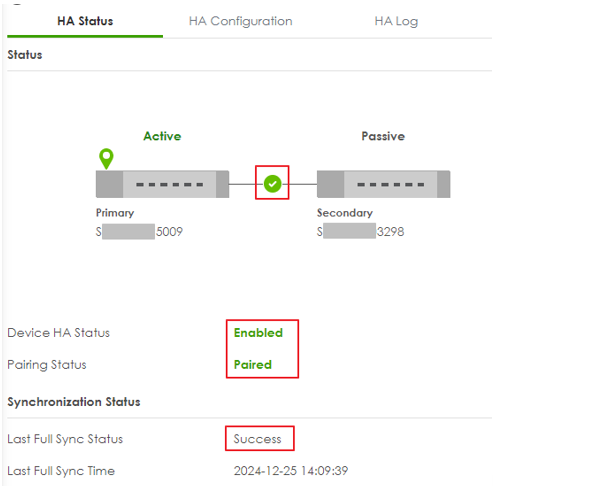
Check HA status
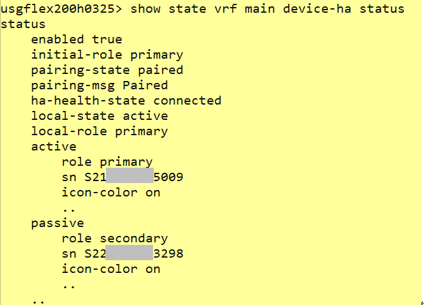
Login to the primary device and go to System > Device HA > HA Status. Make sure the heartbeat link status is connected. You can also use the SYS LED on the active device to check the paring status.
Pairing status: Paired
Last Full Sync Status: Success
You can also enter the command on the primary device to check HA status. usgflex200h> show state vrf main device-ha status
Synchronization can take up to 5 minutes or so. Once it has finished synchronizing, you can verify if the settings are synchronized by accessing the passive device through Passive Node Management IP. Once pairing is complete, the secondary device’s license will automatically be transferred to the primary device and you will receive an email notification. For further information and guidance on how this license transfer is handled, please refer to this article.
If Paring Status is not “Paired”, check what the error message is and resolve the error. In this example, the error is “Device firmware mismatch”. Check the firmware version on primary and secondary again and make sure firmware version on both devices are identical.


HA Synchronization
- Full Synchronization: Full Sync will be performed under the following conditions. You can also useSYS LED on the passive device to check the status of HA synchronization.
- After device reboot
- After firmware update
- After turning off Pause Device HA
- After heartbeat connection is restored
- After performing CLI on active device to manually force a full synchronization
usgflex200h> cmd device-ha force-sync full
- Incremental Synchronization: This happens automatically when changes are made to the active firewall. The updates are synced to the passive firewall within 5 seconds. It is important to only make configuration changes on the active device.

Connect the network cables to the secondary device
Once the devices have been properly synchronized, connect all network cables to wan and lan interfaces of the secondary devices.
Categories
- All Categories
- 442 Beta Program
- 3K Nebula
- 234 Nebula Ideas
- 132 Nebula Status and Incidents
- 6.7K Security
- 691 USG FLEX H Series
- 365 Security Ideas
- 1.8K Switch
- 87 Switch Ideas
- 1.4K Wireless
- 56 Wireless Ideas
- 7.1K Consumer Product
- 312 Service & License
- 505 News and Release
- 97 Security Advisories
- 31 Education Center
- 10 [Campaign] Zyxel Network Detective
- 5.1K FAQ
- 34 Documents
- 89 About Community
- 114 Security Highlight