How to Configure 802.1x to Secure the Wireless Environment with an Internal RADIUS in NXC?
 Zyxel Employee


The example instructs how to set up NXC controller and let users do local authentication without external radius server. The user data base is set up in the NXC controller and the client can enter the username and password to do authentication via 802.1x.
4.4.1 Configure Authentication Method Setting
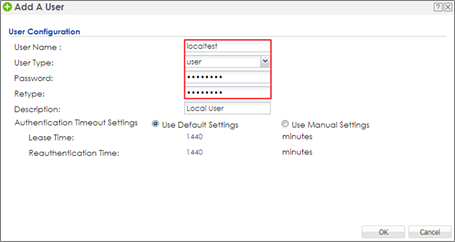
1 Go to CONFIGURATION > Object > User/Group, and click add to create a new user ID and password. Stations can log in to connect with the AP to access the Internet via this account.
2 Go to CONFIGURATION > Object > Auth. Method, and click add to create an authentication method. Enter the Name of this authentication method and select to local in the Method List.
3 Go to CONFIGURATION > System > Auth. Server, and set Authentication Method to localtest which is created in step 2.
4.4.2 Configure AP Profile
1 Configure the AP profile to use 802.1x authentication that user needs to log in with their ID and Password when connecting to the AP’s SSID. Go to CONFIGURATION > Object > AP Profile > SSID > Security List, and click Add to add security for 802.1x.
In General Settings, enter the Profile Name and change Security Mode to wpa2.
In Radius Settings, select to Internal and it means the authentication needs NXC to communicate with external LDAP server.
In Authentication Settings, select 802.1x and Auth. Method is localtest. Click OK.
2 Go to CONFIGURATION > Object > AP Profile > SSID > SSID List, click add to add a SSID for the connection with 802.1x security. Key in the Profile Name and SSID, and change Security Profile to local802 which is created in step1. Click OK to save.
3 Go to CONFIGURATION > Wireless > AP Management > AP Group, select the default AP profile and edit. Select local802 in the SSID Profile. Click Override Member AP Setting to apply the SSID to the AP and click Yes in the pop-up window. Click OK.
4.4.3 Test the Result
1 Before connecting the SSID, the computer needs to do some settings to make the connection successfully. Here is an example for Windows 7.
Opening Network and Sharing Center in computer, click Set up a new connection or network to build up a new network.
2 Select Manually connect to a wireless network. Click Next.
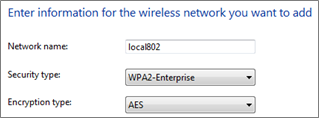
3 Key in the SSID to Network name and change the Security type to WAP2-Enterprise, and the Encryption type is AES. Click Next.
4 Select Change connection settings.
5 Select Security type to WPA2-Enterprise, and Encryption type is AES. Click Settings.
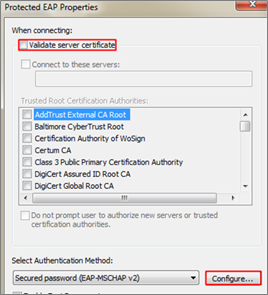
6 Uncheck Validate server certificate and click Configure.
7 Uncheck the selection of pop-up window. Click OK.
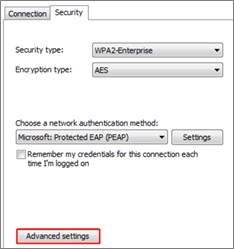
8 Go back to the security setting page and click Advanced settings.
9 Check Specify authentication mode. Click OK to save.
10 Select and connect to the pre-defined SSID "ADTest". Enter user credentials for authentication. After entering the correct ID and password, the wireless connection is set up successfully.
Categories
- All Categories
- 442 Beta Program
- 2.9K Nebula
- 217 Nebula Ideas
- 127 Nebula Status and Incidents
- 6.5K Security
- 574 USG FLEX H Series
- 344 Security Ideas
- 1.7K Switch
- 84 Switch Ideas
- 1.4K Wireless
- 52 Wireless Ideas
- 6.9K Consumer Product
- 297 Service & License
- 474 News and Release
- 91 Security Advisories
- 31 Education Center
- 10 [Campaign] Zyxel Network Detective
- 4.8K FAQ
- 34 Documents
- 87 About Community
- 102 Security Highlight


