Claim settings and usage on Google workspace and NCC.

 Zyxel Employee
Introduction
Claims are additional user attributes included in each OIDC authentication response, based on the authenticated user’s identity (e.g., country, group membership). These attributes can be leveraged by relying parties (e.g., access points, firewalls) to enable user awareness and enforce user privilege policies.
Currently, Google Workspace does not provide a web-based interface for customizing OIDC claims. Administrators can only utilize the default claims provided by Google Workspace. For the list of supported claims, please refer to Google’s documentation:
To ensure that claims are correctly delivered from the Identity Provider (IdP) through the Nebula Identity Federation Service (IFS) to the target devices—and subsequently used for policy enforcement—configuration is required in the following two areas:
- Configure which claims IFS forwards to relying parties
- Configure user privilege policies based on claims on NCC
Step 1: Configure which claims IFS forwards to relying parties
- Sign in to NCC.
- Navigate to Organization-wide > Identity federation service > Identity provider.
- Locate the relevant Identity Provider and click Edit.
- In the Additional claims field, enter the claim names Google provided in the document
Note: The claim names entered here must exactly match those provided by Google workspace
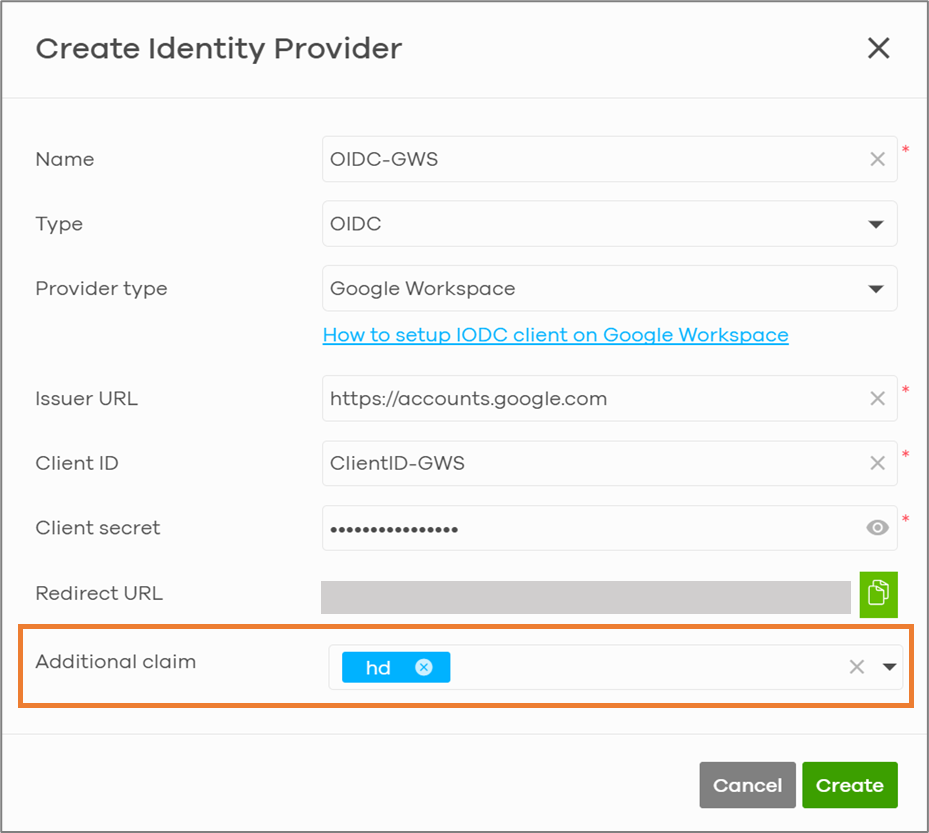
Step 2:Configure User Privilege Policies Based on Claims on NCC
- Navigate to Org-wide > Nebula identity federation service > User Privilege.
- Click Add, and in the dialog:
- Select the corresponding Identity Provider
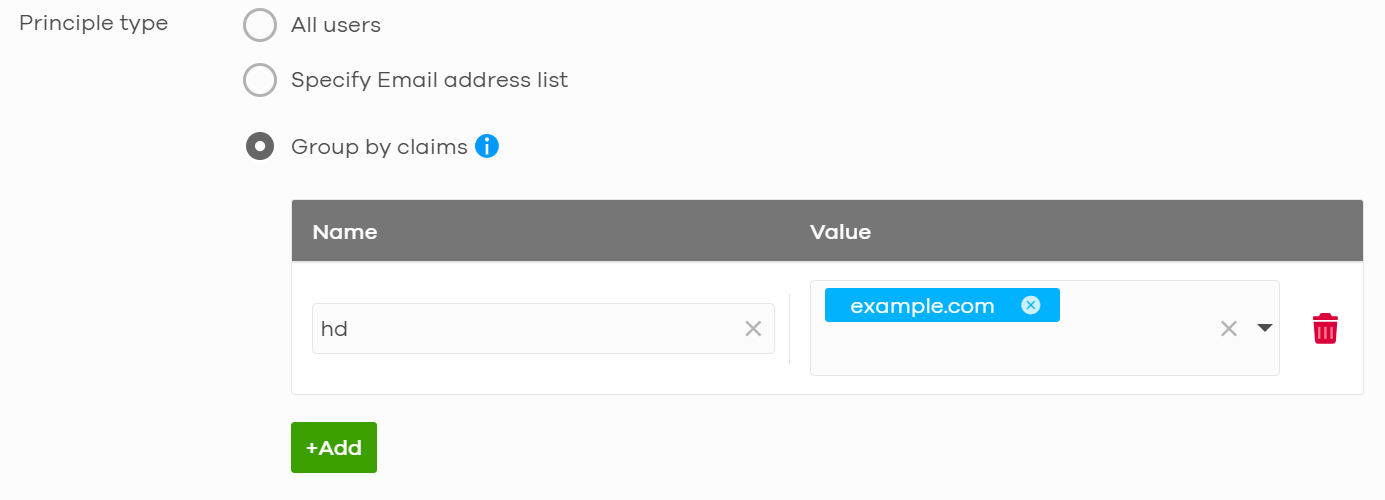
- Set Principal type to “Group by claims”
- Click Add to define claim conditions:
- In the Name field, enter the claim name
- In the Value field, specify the matching value
- Repeat as needed to add multiple claims
Note: When multiple claims are configured, users must match all claim names to be selected. Within each claim, matching any listed value is sufficient.
- Click Next.
- Under Select service, define which services the matched users are allowed to access.
- Click Next.
- Review the configuration in the summary page, then click Create to complete the setup.
Categories
- All Categories
- 442 Beta Program
- 3.1K Nebula
- 242 Nebula Ideas
- 6.8K Security
- 764 USG FLEX H Series
- 385 Security Ideas
- 1.8K Switch
- 87 Switch Ideas
- 1.5K Wireless
- 58 Wireless Ideas
- 7.2K Consumer Product
- 324 Service & License
- 524 News and Release
- 100 Security Advisories
- 31 Education Center
- 10 [Campaign] Zyxel Network Detective
- 5.3K FAQ
- 34 Documents
- 91 About Community
- 121 Security Highlight