How to configure ACL to rate limit IP traffic

 Zyxel Employee


In some networks, it is necessary to configure rate limits among VLANs. For example, VLAN 10 is for employees within the organization; VLAN 20 is for guests. By rate limiting VLAN 20, we can ensure better bandwidth or network performance for users in VLAN 10. This example shows administrators how to configure ACL to rate limit VLAN traffic. Results are verified by observing and comparing the upload and download rate between VLAN 10 and VLAN 20.

Note:
All network IP addresses and subnet masks are used as examples in this article. Please replace them with your actual network IP addresses and subnet masks.
1. Configure VLAN and Route Traffic
1-1. Configure the VLAN setting (VLAN 10 and VLAN 20) on Switch-1 and Switch-2 (You can refer to here)
1-2. Configure the route traffic on Switch-1 and Switch-2 (You can refer to here)
2. Configure the Classifier
2-1. Set up the Classifier on Switch-2: Go to Menu > Advanced Application > Classifier > Classifier Configuration. Set up 4 Classifier: Classifier for download and upload in VALN 10 and VLAN 20. Therefore, there are total 4 Classifiers.
Note:
ACL causes traffic that matches the criteria of a Classifier to follow its corresponding Policy Rule.
2-2. The Classifier for download traffic in VLAN 10: Check the “Active” box and key in the Name. Set Layer 3 > Destination as 192.168.10.0/24 (Means the destination is in VLAN 10) and Source as 192.168.1. 100/32 (Means the source is FTPServer). Press “Add”.


2-3. The Classifier for upload traffic in VLAN 10: Check the “Active” box and key in the Name. Set Layer 3 > Destination as 192.168.1.100/32 (Means the destination is FTPServer) and Source as 192.168.10.0/24 (Means the source is from VLAN 10). Press “Add”.


2-4. The Classifier of download in VLAN 20: Check the “Active” and key in the Name. Set Layer 3 > Destination as 192.168.20.0/24 (Means the destination is in VLAN 20) and Source as 192.168.1.100/32 (Means the source is FTPServer). Press “Add”.
2-5. The Classifier of upload in VLAN 20: Check the “Active” and key in the Name. Set Layer 3 > Destination as 192.168.1.100/32 (Means the destination is FTPServer) and Source as 192.168.20.0/24 (Means the source is from VLAN 20). Press “Add”.
3. Configure the ACL (Policy Rule)
3-1. Set up the Policy Rule on Switch-2: In section 2, we created 4 Classifiers. We can find that they are shown in the Policy Rule window for us to match. Go to Menu > Advanced Application > Policy Rule.
3-2. The Policy Rule of download traffic in VLAN 10: Check the “Active” box and key in the Name. Select the Classifier of download in VLAN 10 (DL10). Set up the action to do if match this Classifier: Bandwidth Metering=40960 kbps. Enable Metering and set the Out-of-profile action (Means what to do if the rate is over the bandwidth) as “Drop the packet” (Means Switch-2 will drop the traffic which is over the bandwidth). Press “Add”.


3-3. The Policy Rule of upload in VLAN 10: Check the “Active” and key in the Name. Select the Classifier of upload in VLAN 10 (UP10). Set up the action to do if match this Classifier: Bandwidth Metering=20480 kbps. Enable Metering and set the Out-of-profile action as “Drop the packet”. Press “Add”.
3-4. The Policy Rule of download in VLAN 20: Check the “Active” and key in the Name. Select the Classifier of download in VLAN 20 (DP20). Set up the action to do if match this Classifier: Bandwidth Metering=20480 kbps. Enable Metering and set the Out-of-profile action as “Drop the packet”. Press “Add”.
3-5. The Policy Rule of upload in VLAN 20: Check the “Active” and key in the Name. Select the Classifier of upload in VLAN 20 (UP20). Set up the action to do if match this Classifier: Bandwidth Metering=10240 kbps. Enable Metering and set the Out-of-profile action as “Drop the packet”. Press “Add”.
4. Test the Result
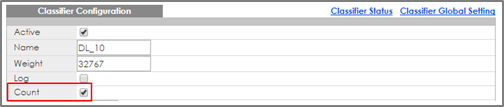
4-1. Go to Menu > Advanced Application > Classifier. Check “Count”. If the traffic matches the classifier, the Match Count for this classifier should be increasing every time the web page refreshes.

4-2. Use PC-1 to download a file from the FTP Server. Transfer rate should be more or less 5 MB/s (or 40960 Mb/s).

4-3. Use PC-1 to upload a file to the FTP Server. Transfer rate should be more or less 2.6 MB/s (or 20480 Mb/s).

4-4. Use PC-2 to download a file from the FTP Server. Transfer rate should be more or less 2.6 MB/s (or 20480 Mb/s).

4-5. Use PC-2 to upload a file to the FTP Server. Transfer rate should be more or less 1.2 MB/s (or 10240 Mb/s).

5. What Could Go Wrong
5-1. When setting up the Classifier, remember to consider both the source and destination of the traffic. In the example, if we only set up the source as VLAN 10 (192.168.10.0/24) during file upload the Server, but didn’t set up the destination (Server IP: 192.168.1.150), it will cause all the traffic to be rate limited when the PC try to send traffic to others from VLAN 10.
Categories
- All Categories
- 442 Beta Program
- 3K Nebula
- 232 Nebula Ideas
- 131 Nebula Status and Incidents
- 6.7K Security
- 684 USG FLEX H Series
- 362 Security Ideas
- 1.8K Switch
- 87 Switch Ideas
- 1.4K Wireless
- 56 Wireless Ideas
- 7.1K Consumer Product
- 310 Service & License
- 504 News and Release
- 97 Security Advisories
- 31 Education Center
- 10 [Campaign] Zyxel Network Detective
- 5.1K FAQ
- 34 Documents
- 89 About Community
- 112 Security Highlight