How to configure captive portal with My RADIUS server(using Windows Server as example)?

 Zyxel Employee

Nebula provides the option to let users authenticate into wireless networks by using sign-on with my RADIUS server, connecting to a domain controller located in the network.
Pre-requisites: An SSID network needs to be configured in order to apply sign-on with my RADIUS server for the clients connecting to the wireless network.
1. Enable Sign-on with My RADIUS server
a) Go to at Configure > Access point > SSID advanced settings
b) Select the SSID to configure from the drop-down list.
c) Click Sign-on with and choose My RADIUS server
d) Input My RADIUS server information: IP address of server host, the port configured and the secret key
e) Click Save button

f) Adjust the settings base on your application in Captive portal advance setting if needed
- Wall garden: Enable Wall garden and add the website that the customer can access without passing the authentication.

- Simultaneous login limit: This can restrict the login devices at a time. It could be one device or multiple devices. Click Model list to know about the number can set here.
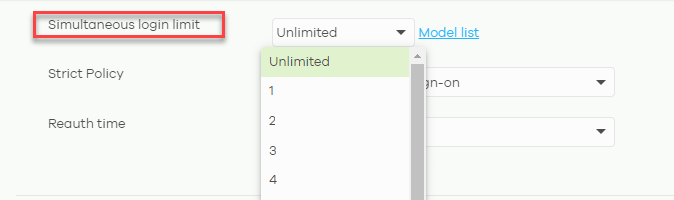
- Strict Policy: Allow HTTPs traffic without sign-on or not.

- Reauth time: The captive portal page will pop out again when the lease time is expired. We can set the time or follow site-wide setting (The path: Configure > Site settings > Captive portal reauthentication > For cloud authentication users).

2. Configure domain controller (Windows Server 2008 Enterprise used as example)
In order to use
My RADIUS server option, user needs to configure the RADIUS server and Active
Directory roles in the domain controller.
a) Using Windows Server 2008 Enterprise edition,
open the Server Manager and use the left panel to get into the path: Role >
Network Policy and Access Services > NPS(local) > RADIUS Clients and
Servers. Create a RADIUS client by right-click on RADIUS clients and select New
RADIUS Client.
b) A new window will pop-up, user have to
specify a name in Friendly name field, the address of the client (IP or DNS)
and input the shared secret key (Shared secret and confirm shared secret
fields).

Note: RADIUS
client IP address should be the AP’s IP address if the server is located into
the same segment as the access point. If a gateway is located between the AP
and server, RADIUS client IP should be the gateway IP address.
c) Create the connection request policies
following the path: Role > Network Policy and Access Services >
NPS(local) > Policies, right-click on Connection request policies and select
New.
d) In the following window that pops-up, define
a Policy name and click Next

e) In the
following window, click the Add button located in the bottom part and another
window will appear.
f) Scroll down to RADIUS Client section and
select Client IPv4 Address and click add. User can specify more details about
the RADIUS client if necessary.
g) Type the IP address of the RADIUS client and
click OK.

h) Click Next (x4) button for the following steps and finally click Finish.
i) Now that you have created the policies to handle requests, it is necessary to define the users in the domain following the path: Active Directory Domain Services > Active Directory Users and Computers > Select the domain configured, right-click on Users folder and select New > User

j) A new window
will be displayed in which it is necessary to input user information as First
Name and User logon name selecting a the respective domain, and click Next.
k) The following step requires inputting the
password and user is able to customize account access settings.
![]()
l) By clicking Next and Finish buttons, the configuration to authenticate using RADIUS server finished.
3. Verification
Connect to SSID and enter the account information to authenticate. Client can surf the internet if the authentication passes.

Zyxel_Judy
Categories
- All Categories
- 442 Beta Program
- 3.1K Nebula
- 234 Nebula Ideas
- 6.7K Security
- 695 USG FLEX H Series
- 366 Security Ideas
- 1.8K Switch
- 87 Switch Ideas
- 1.4K Wireless
- 56 Wireless Ideas
- 7.1K Consumer Product
- 312 Service & License
- 510 News and Release
- 97 Security Advisories
- 31 Education Center
- 10 [Campaign] Zyxel Network Detective
- 5.1K FAQ
- 34 Documents
- 89 About Community
- 114 Security Highlight