How to Configure Route-based IPsec VPN to Azure (VTI over IKEv2/IPSec)

 Zyxel Employee


Azure Multi-Site connection
This type of connection is a variation of the Site-to-Site connection. You create more than one VPN connection from your virtual network gateway, typically connecting to multiple on-premises sites. When working with multiple connections, you must use a Route-based VPN type (known as a dynamic gateway when working with classic VNets). Because each virtual network can only have one VPN gateway, all connections through the gateway share the available bandwidth. This is often called a "multi-site" connection.
Before you begin
Before you begin configuration, verify that you have the following:
- -You have a Azure virtual network that was created using the Resource Manager deployment model
- -The virtual network gateway for your VNet is RouteBased. If you have a PolicyBased VPN gateway, you must delete the virtual network gateway and create a new VPN gateway as RouteBased.
- -None of the address ranges of each local network sites overlap for any of the VNets that this VNet is connecting to.
- -An externally facing public IPv4 IP address for each ZyWALL device. The IP address cannot be located behind a NAT. This is requirement.
Route-based IPsec VPN to Azure VNet with static
route

Here the configuration steps on Azure portal,
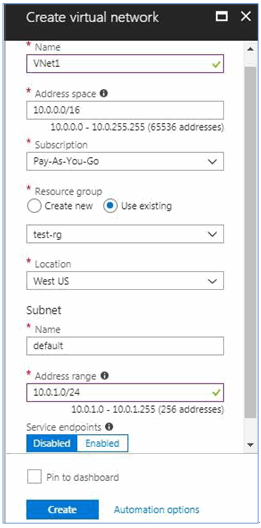
1. Create a virtual network (VNet)
- From a browser, navigate to the Azure portal and sign in with your Azure account.
- Click Create a resource. In the Search the marketplace field, type 'virtual network'. Locate Virtual network from the returned list and click to open the Virtual Network page.
- Near the bottom of the Virtual Network page, from the Select a deployment model list, select Resource Manager, and then click Create. This opens the 'Create virtual network' page.
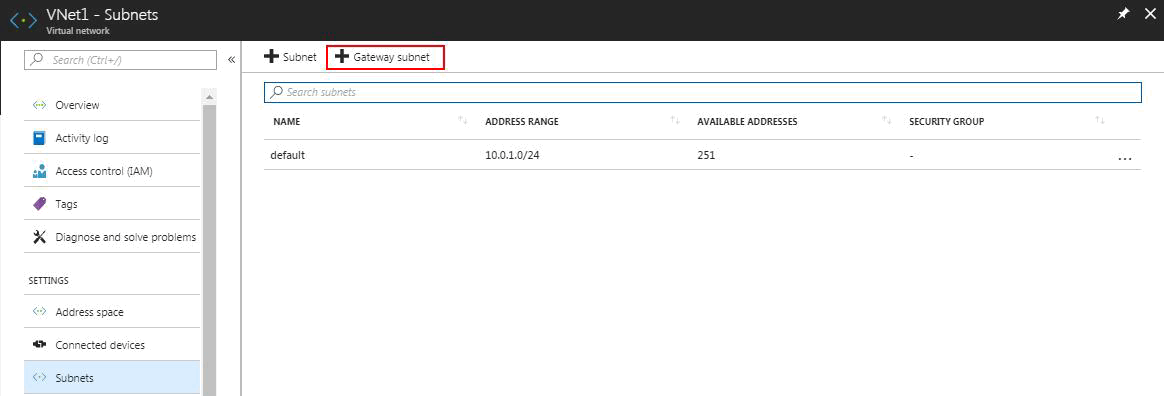
2. Create the gateway subnet
The virtual network gateway use specific subnet called gateway subnet. It’s part of the virtual network IP address space that you specify when creating your virtual network. It contains IP addresses that the virtual network gateway resources and services use.1. In the portal, navigate to the virtual network for which you want to create a virtual network gateway.
2. In the Settings section of your VNet page, click Subnets to expand the Subnets page.
3. On the Subnets page, click +Gateway subnet at the top to open the Add subnet page.
4. The Name for your subnet is automatically filled in with the value 'GatewaySubnet'. The GatewaySubnet value is required in order for Azure to recognize the subnet as the gateway subnet. Adjust the auto-filled Address range values to match your configuration requirements.
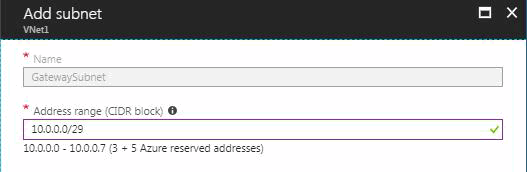
5. To create the subnet, click OK at the bottom of the page.
3. Create the VPN gateway
1. On the left side of the portal page, click + and type 'Virtual Network Gateway' in search. In Results, locate and click Virtual network gateway.
2. At the bottom of the 'Virtual network gateway' page, click Create. This opens the Create virtual network gateway page.
3. On the Create virtual network gateway page, specify the values for your virtual network gateway.
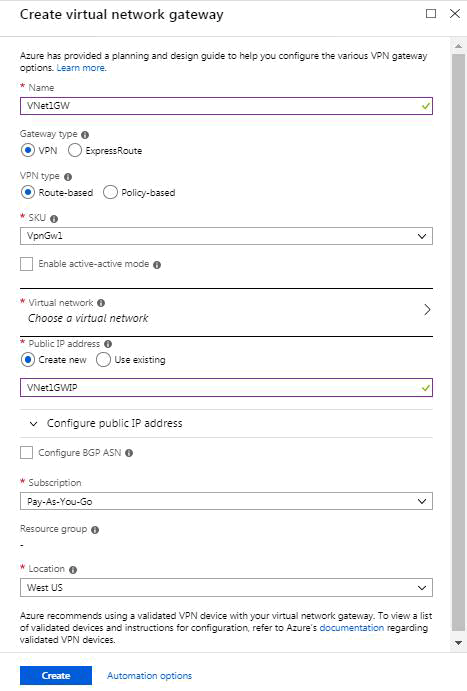
Name: Vnet1GW
Gateway type: VPN
VPN type: select the Route-based VPN type
SKU: VpnGw1
Virtual network: Click Virtual network/Choose a virtual network to open the Choose a virtual network page. Select VNet1.
- Public IP address: This setting specifies the public IP address object that gets associated to the VPN gateway.
In the text box, type a Name for your public IP address. For this exercise, use VNet1GWIP.
- Location: select the location same as your VNet
4. Click Create to begin creating the VPN gateway.
After the gateway is created. On the left side of the portal page, click All resources and click into the virtual network gateway to view more information. The Public IP address will show on the right side.
4. Create the local network gateway
The local network gateway typically refers to your on-premises location. You give the site a name by which Azure can refer to it, then specify the IP address of the on-premises ZyWALL device to which you will create a connection.
1. In the portal, click +Create a resource.
2. In the search box, type Local network gateway, then press Enter to search.
This will return a list of results. Click Local network gateway, then click the Create button to open the Create local network gateway page.
3. On the Create local network gateway page, specify the values for your local network gateway.
The most important part is the Address space. It’s the address ranges of your on-premises network (in this example, it’s 10.1.0.0/24 & 10.1.1.0/24). And remember to add the address of IPSec VTI interface of ZyWALL in the address space list (in this example, it’s 10.1.254.1/32).
This address spaces is how Azure VNet use to add route for traffic from Azure VNet to your on-premises network.
Note: Make sure that the ranges you specify here do not overlap with ranges of other networks that you want to connect to.

4. Click the Create button at the bottom of the page to create the local network gateway.
5. Create the VPN connection
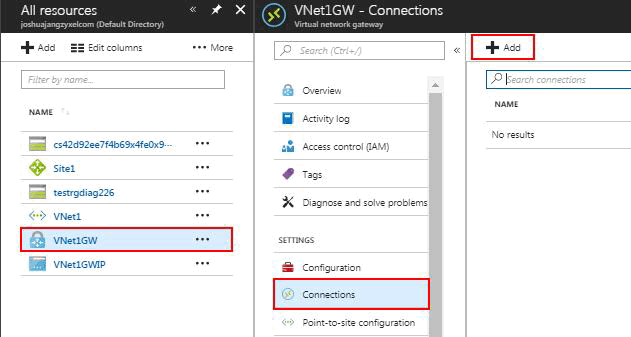
1. Navigate to and open the page for your virtual network gateway.
2. On the page for VNet1GW, click Connections. At the top of the Connections page, click +Add to open the Add connection page.
3. On the Add connection page, configure the values for your connection. Select Site-to-site (IPSec) as connection type.
Type in the Shared key (PSK) which you need configure the same value as the Pre-Shared Key in the VPN gateway settings page of your ZyWALL.
Note: Pre-shared key must be at least 8 to 32 characters.

After finishing the VPN configure on the Azure portal. Then you can configure the related VPN settings on your ZyWALL.
-------------------------------------------
Here the configuration steps on your ZyWALL,
1. Create the VPN Gateway Rule (Phase 1)
On ZyWALL Web GUI, go to CONFIGURATION > VPN > IPSec VPN > VPN
Gateway, click Add to create a VPN Gateway rule.
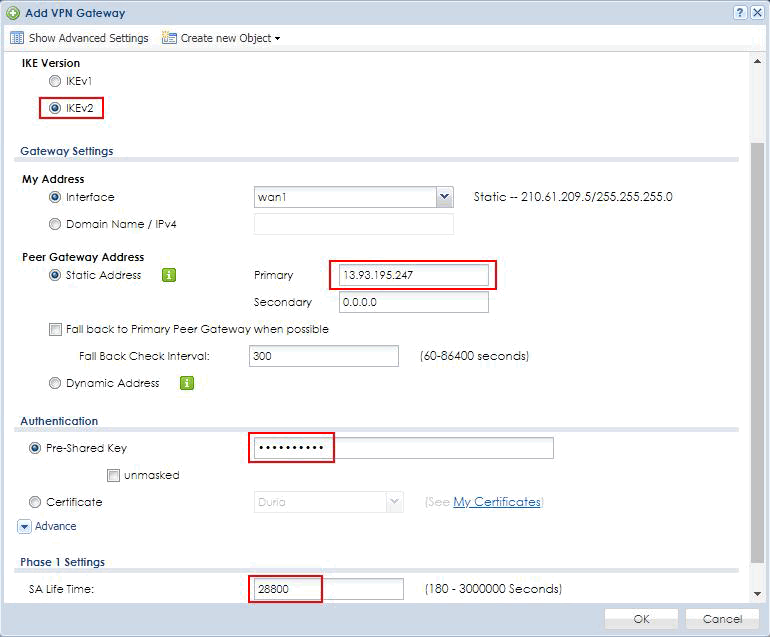
On the Add VPN Gateway page, specify the values for your virtual network gateway.
· Enable: check the Enable box to activate this rule
· Name: “Azure” as the rule name in this example
· IKE Version: IKEv2
· Peer Gateway Address: select static address and fill in Public IP address of Azure virtual network gateway in the Primary field
· Pre-Shared Key: fill in the Shared Key(PSK) of Azure VPN connection
· SA Life Time: 28800 seconds
· Encryption algorithm: keep the default value, AES128
· Authentication algorithm: keep the default value, SHA1
· Key Group: keep the default value, DH2
2. Create the VPN Connection Rule (Phase 2)
On ZyWALL Web GUI, go to CONFIGURATION > VPN > IPSec VPN > VPN
Connection, click Add to create a VPN Connection rule.
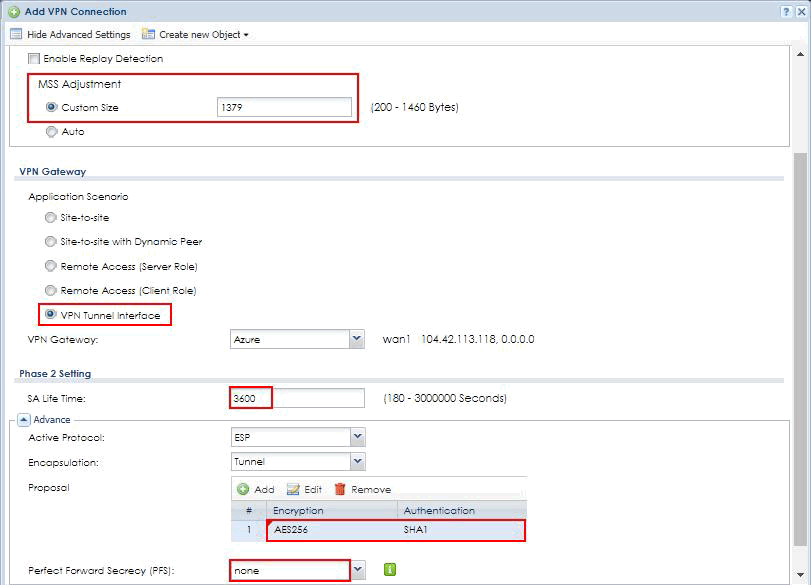
On the Add VPN Connection page, specify the values for your virtual network gateway.
· Enable: check the Enable box to active this rule
· Name: “Azure” as the rule name in this example
· TCP MSS: 1379 Bytes
· Application Scenario: select VPN Tunnel Interface for route-based VPN
· VPN Gateway: select “Azure”
· SA Life Time: 3600 seconds
· Encryption algorithm: select AES256
· Authentication algorithm: keep the default value, SHA1
· PFS: select none
Note: The Phase 2 Encryption algorithm should select as AES256 only to full compatible with Azure VPN gateway.
3. Create VTI Interface
On ZyWALL Web GUI, go to CONFIGURATION > Network > Interface > VTI, click Add to create a VTI interface

· Interface Name: vti0
· Zone: IPSec_VPN
· vpn-rule: Azure
· IP Address: 10.1.245.1
· Subnet Mask: 255.255.255.252
4. Create Static Route
On ZyWALL Web GUI, go to CONFIGURATION > Network >
Routing > Static Route, click Add to create a static route.
· Destination IP/Subnet Mask: 10.0.0.0/255.255.0.0 , this is the VNet address space on Azure
· Interface: vti0
Reference:
Categories
- All Categories
- 442 Beta Program
- 3K Nebula
- 231 Nebula Ideas
- 131 Nebula Status and Incidents
- 6.6K Security
- 680 USG FLEX H Series
- 362 Security Ideas
- 1.8K Switch
- 87 Switch Ideas
- 1.4K Wireless
- 56 Wireless Ideas
- 7.1K Consumer Product
- 309 Service & License
- 502 News and Release
- 96 Security Advisories
- 31 Education Center
- 10 [Campaign] Zyxel Network Detective
- 5.1K FAQ
- 34 Documents
- 89 About Community
- 111 Security Highlight