Now Available: Single Sign-On with Microsoft Entra ID for Zyxel Account

 Zyxel Employee


Simplify Your Access, Enhance Your Security
We're excited to announce a powerful new feature for Zyxel Account users! Now you can streamline your login experience with Microsoft Entra ID integration, enabling Single Sign-On (SSO) across all Zyxel platforms. This seamless authentication method eliminates the need for separate passwords while enhancing security through your organization's identity management system.
This guide explains how to configure Microsoft Entra ID (formerly Azure AD) as an Identity Provider (IdP) for Zyxel Account, making authentication simpler and more secure for your entire organization.
Key Benefits of Microsoft Entra ID Integration
✓ Enhanced Security: Leverage Microsoft's robust identity verification systems
✓ Streamlined Access: One-click login across all Zyxel platforms
✓ Simplified Management: Centralized user administration through your Microsoft environment
✓ Reduced Password Fatigue: No more separate Zyxel Account passwords to remember
✓ Improved Compliance: Better audit trails and access controls
Important to Know Before You Begin
Settings
1. Each domain can only be configured with one set of Entra ID settings to ensure consistent authentication and access control across your organization.
2. Once an Entra Application ID configuration is verified for a domain, any identical Entra Application ID and domain pairs will be blocked and removed.
3. Once IT completes the Entra ID configuration, all users within the same domain will automatically transition to 'Continue with Microsoft Entra ID' as their authentication method.
For New User
1. When a new user from a configured domain successfully signs in with Entra ID for the first time, a Zyxel Account will be automatically created.
2. When users from a configured domain attempt to sign in through non-Entra ID methods, they will receive an email notification informing them that 'Continue with Microsoft Entra ID' is the exclusive authentication method for their organization.
3. Once the IT team completes the Entra ID configuration, it will be the only login method for the company domain. Users will no longer have the option to log in using conventional username and password combinations.
For IT
1. IT should not use delegate email or shared email address, which doesn't have password, to process Entra ID settings as it will encounter issues during the testing phase.
2. For IT to disable Entra ID after deployment, please follow the EITS process to submit a ticket.
3. For IT to change the email address, please follow the EITS process to submit a ticket.
4. The “users & groups” list assigned on Entra ID (Authentication) and the Org/Site administrator list on Nebula (Authorization) serve different management purpose and need to be managed separately. After configuring Entra ID as the authentication method, network administrators must manually add account and assign permissions under [Org-wide > Administrators] or [MSP > MSP cross-org manage > Admins & teams] to ensure proper authorization.
5. When an employee leaves the company and his account is removed from Entra ID, network administrators should also remove the corresponding entries from the above NCC pages to keep access permissions up to date.
Prerequisites
- Microsoft Entra ID administrator account with global admin privileges
- Zyxel account using Email & Password method
Step-by-Step Configuration
Step 1: Log in to your Zyxel Account at

Or navigate to Manage Account from the profile when you are in another Zyxel platform.

Step 2: Navigate to Microsoft Entra ID tab, and toggle on the Set up Microsoft Entra ID

Step 3: Click Download metadata XML File for later use

Step 4: Access Microsoft Entra Admin Center
- Link to access
- Sign in with an account that has Global Administrator or Enterprise Application Administrator privilege

Step 5: Create Enterprise Application
- From the left menu, select Applications > Enterprise Applications

- Click New Application

- Click Create your own Application

- Enter a name (e.g., "Zyxel Account SSO")
- Choose Integrate any other application you don't find in the gallery, and click Create

Step 6: Configure Single Sign-On
- Select Set up single sign on

- Choose SAML as the sign-on method

- Upload the Metadata XML file (Basic SAML Configuration section from Step 3)

Step 7: Configure Attributes & Claims
- Map user.userprincipalname → Name ID
- Other common attributes: givenname, surname, email

Step 8: Download IdP Metadata File
- On the same page, locate the SAML Certificate section
- Download the IdP Metadata XML file for Zyxel Account (SP) integration

Step 9: Upload IdP Metadata File
- Return to Zyxel Account settings.
- Click Upload file button to choose the Entra ID metadata file,

- Click Save

Note: Common upload failures may be due to:
- Incorrect file format (must be XML)
- Invalid data structure
- Non-Microsoft Entra ID metadata file
- Domain already configured
- Application already in use
Step 10: Verify Entra ID Configuration
- Click Verify to open a new verification page

- Sign in using the same email as your Zyxel Account

- Upon successful login, you'll see a verification success page

- The status will change to "Verified" in the Entra ID settings

Step 11: Assign Users or Groups
- Navigate to Users & Groups menu, click Assign users & groups

- Select the checkboxes next to the users or groups that need SSO access, then click the Select button. The selected users and groups will appear in the panel on the right side.

- Click Assign button

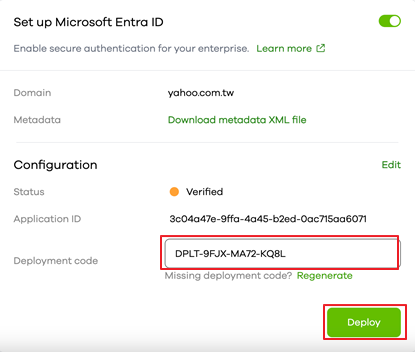
Step 12: Deploy Entra ID Settings
- Copy the deployment code from successful deployment in step 10 and paste it in the Deployment code. Click Deploy
- Users with the same domain will receive a notification email

- IT administrators will also receive a confirmation email

- The deployment completion screen of Entra ID settings is as follows

Step 13: Continue with Microsoft Entra ID
- Return to Zyxel Account login page, and click Continue with Microsoft Entra ID

- Enter Domain of your company, and click Continue button

- Enter your Entra ID credentials, and click Next button

- Login successful
—
What can IT do if login issues occur?
- IT administrators can click the Forgot Password button on the login page.

- Enter the IT email address to receive an authorization email for troubleshooting access. Click Send button

- An authorization email will be sent to grant IT administrator login access.

Zyxel_Judy
Comments
-
Hello, once I have completed the process, it does not allow me to access the Nebula console because it detects federated authentication through Microsoft Enter ID as not a multifactor authentication method for an administrator. I see the following message: You cannot access [XVXBXBXB] due to privacy settings. Please check the following: Two-factor authentication is enforced for all admins in this organization. Please verify that 2FA is setup for your Zyxel account.
0 -
Additionally, could you explain how to add new users once the deployment has been executed? Also, explain how to disable federated authentication using Microsoft Login ID if necessary.
0 -
Dear @leasba,
Greetings.
For your first question: If your Org enables 2FA, the system will prompt all organization admins to enable 2FA for logging in. In your case, I suggest enabling two-factor authentication (2FA) when you use MS Entra ID to log in, which can be set in the MS Portal.
Regarding the second question, if you need to edit a user after deployment, please use the MS Portal to edit the user within the group, and then update the metadata.
Feel free to have any feedback from you.
Thanks.
Ivan
1 -
This works perfectly, but it disables local login for the "main" account, which I would like to use as emergency access account with local password.
This Emergency account has however shared email domain with our regular users? Shoud I have emergency account in different domain than regular users?
0 -
Hi @Jerenius,
Since the domain has been set to log in with Entra ID, it's unable to log in with an account and password.
You can create an account on a different domain and add it to the Org as a Delegate Admin.
Thanks.
Ivan
0
 Freshman Member


Categories
- All Categories
- 442 Beta Program
- 3K Nebula
- 232 Nebula Ideas
- 132 Nebula Status and Incidents
- 6.7K Security
- 691 USG FLEX H Series
- 364 Security Ideas
- 1.8K Switch
- 87 Switch Ideas
- 1.4K Wireless
- 56 Wireless Ideas
- 7.1K Consumer Product
- 312 Service & License
- 504 News and Release
- 97 Security Advisories
- 31 Education Center
- 10 [Campaign] Zyxel Network Detective
- 5.1K FAQ
- 34 Documents
- 89 About Community
- 112 Security Highlight