[Important Announcement] End of FTP Service Support for Home NAS Series

 Zyxel Employee


Dear Users,
To provide a more secure and reliable service experience, we would like to inform you that FTP service support for the Home NAS series will be officially discontinued at the end of December 2025. Please take the necessary steps in advance to prepare for this change using the workaround provided below.
Timeline
- Announcement: June 2025
- FTP Service Shutdown Date: October 31, 2025
Why is FTP Support being Discontinued?
Some models in the Home NAS series have reached End of Life (EOL) and no longer receive updates or official support. Additionally, The FTP protocol is outdated and lacks encryption, making it increasingly vulnerable to security and performance risks. To safeguard your data and ensure continuity of service, we strongly recommend transitioning to more modern and secure storage solutions.
Workaround: How to change the application’s syncing location from the PCloud FTP server to local storage?
To migrate your application’s syncing location from the FTP server to local NAS storage, please follow the steps below:
Step 1: Download the ZYPKG File
Visit the appropriate link below to download the ZYPKG file for your specific NAS model.
Note: Make sure to download the file that matches your current NAS model.
NAS540 (updated)
Example: Open your browser and download the ZYPKG file and application for the NAS326 model.

Step 2: Start the Download
After visiting the website, the package download will start automatically.

Please extract the file and verify that all packages have been downloaded correctly.


Step 3: Upload the Files to NAS Storage
1. Go to Control Panel > Privilege and Sharing > Share Folders
2. Click Add Share and name the folder according to your NAS model


Note: The directory must be created in the same location as the admin folder

Step 4: ZYPKG Directory Structure
1. Under NAS542, create a folder named zypkg, then create a subfolder named 5.21 inside it.
2. Place the downloaded package into the 5.21 directory.
Note: The ZYPKG_INFO.tgz file is required

Step 5: Enable SSH and Update the Sync Path
Since the NAS runs on Linux, Windows users may not be familiar with command-line operations. Here's a step-by-step guide to help:
1. Go to Control Panel > Network > Terminal and enable the SSH service on the NAS.


2. Connect to the NAS using an SSH client (e.g., PuTTY for Windows).

3. Log in with the username root and use the same password as the NAS admin account.
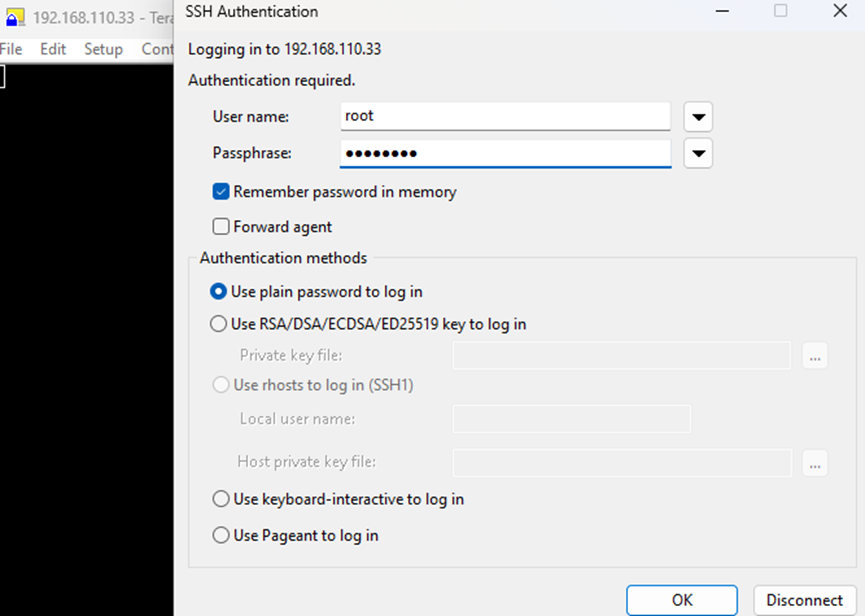
4. Enter the following command: echo "ftp://YOUR_NAS_IP" > /i-data/sysvol/admin/zypkg/web_prefix

Note: If there is no zypkg directory, please enter the following command to create the "zypkg" directory:
mkdir /i-data/sysvol/admin/zypkg/
5. To confirm the update, enter: cat /i-data/sysvol/admin/zypkg/web_prefix

You should now see your NAS IP, indicating the sync location has successfully switched from the PCloud FTP server to the local storage server.
Additional Note:
To enable syncing, anonymous FTP access must be turned on. Go to Control Panel > Service > FTP > General Settings, and enable this option.

🔎 Verification
Verification Steps:
1. Open App Center
2. Browse to All Apps and click Refresh
3. If you see the message "Download List Success", the migration is complete.


If you need help at any point, our support team is here for you. Thank you for being part of the Zyxel community. We’re committed to keeping your network experience both safe and seamless.
Comments
-
There is no package link for NAS540
0 -
The explenation in step 4 is not completely correct.
4. Enter the following command: echo "YOUR_NAS_IP" > /i-data/sysvol/admin/zypkg/web_prefix
Shouldn't it be: echo "ftp://YOUR_NAS_IP" > /i-data/sysvol/admin/zypkg/web_prefix
And before that shouldn't you first do: mkdir /i-data/sysvol/admin/zypkg/0 -
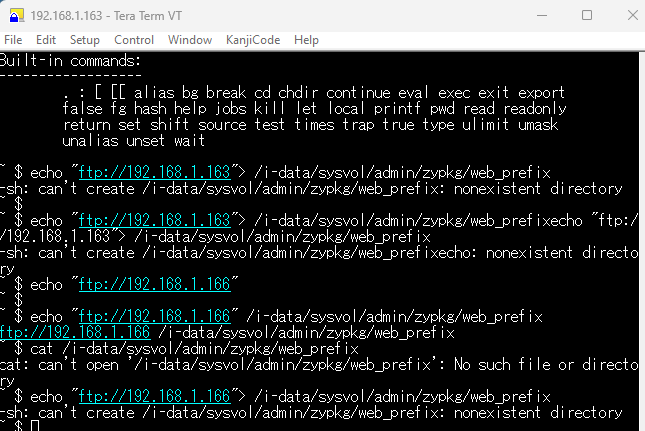
Ho eseguito passo passo la procedura come descritto, ma non è andato a buon fine. Questo è l'esito che ricevo nel terminale:
 1
1 -
Hi @Rainman,
Thanks for your reminder, we've updated the link.
0 -
Hi @Wivern,
Thanks for your detailed reminder. We've updated Step 4 to help with clarification.
0 -
Hi @Giugar
Base on the logs, seems the zypkg directory is not created.
Please enter the command:mkdir /i-data/sysvol/admin/zypkg/
And enter the following command: echo "ftp://YOUR_NAS_IP" > /i-data/sysvol/admin/zypkg/web_prefix
0 -
Ringrazio per l'aiuto ricevuto. Ora la procedura è andata a buon fine.
1 -
It worked. But how can I access my NAS542 remotely? Is there any instruction for that? Is an App available?
0 -
ZyXEL Drive on the Google Play Store:
Currently, the app can be used to access files or videos from the NAS on a mobile device.
However, for more advanced use cases, it may not offer the most convenient experience at this time.0 -
NAS 326 - prosím návod pro technicky neznalé uživatele
0

 Freshman Member


 Ally Member


Categories
- All Categories
- 440 Beta Program
- 2.9K Nebula
- 208 Nebula Ideas
- 127 Nebula Status and Incidents
- 6.4K Security
- 528 USG FLEX H Series
- 331 Security Ideas
- 1.7K Switch
- 84 Switch Ideas
- 1.3K Wireless
- 50 Wireless Ideas
- 6.9K Consumer Product
- 292 Service & License
- 462 News and Release
- 90 Security Advisories
- 31 Education Center
- 10 [Campaign] Zyxel Network Detective
- 4.6K FAQ
- 34 Documents
- 86 About Community
- 99 Security Highlight