[NEBULA] How to configure the AP Security with WPA2 Enterprise with external server?
Options

Nebula_Bayardo
Posts: 179  Zyxel Employee


Zyxel Employee
Nebula provides the option to let users authenticate into wireless networks using WPA2 enterprise with My RADIUS server option, connecting to a domain controller located in the network.
Note: The SSID network needs to be configured in order to apply 802.1X authentication for the clients connecting to the wireless network.
1. Configure the use of 802.1X
Once the SSID is configured, users can enable 802.1X authentication on Nebula at Configure > Access points > SSID advanced settings.
Following the steps:
a) Select the SSID to implement 802.1X from the drop-down list.
b) Select WPA2-Enterprise with My RADIUS Server at Network access.
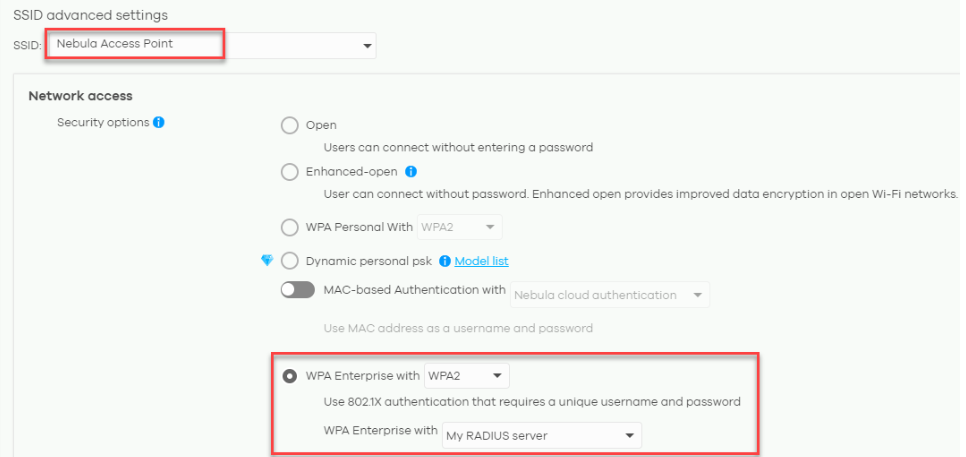
c) A new section about Radius server will appear by selecting My RADIUS server as option. User needs to input IP address of server host, the port configured (default is UDP 1812 for radius connections) and the secret key also configured in the radius server.

2. Configure domain controller (Windows Server 2008 Enterprise used as example)
In order to use My RADIUS server option, user needs to configure the Radius server and Active Directory roles in the domain controller.
a) Using Windows Server 2008 Enterprise edition, open the Server Manager and use the left panel to get into the path: Role > Network Policy and Access Services > NPS(local) > RADIUS Clients and Servers. Create a radius client by right-click on Radius clients and select New RADIUS Client.
b) A new window will pop-up, user have to specify a name in Friendly name field, the address of the client (IP or DNS) and input the shared secret key (Shared secret and confirm shared secret fields).
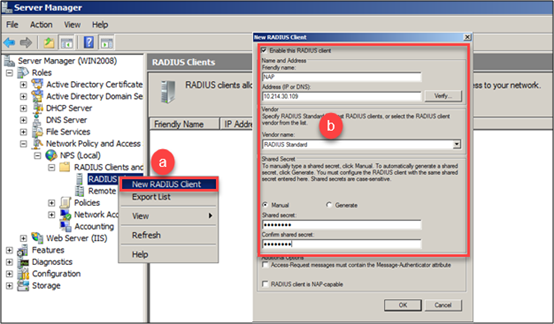
Note: Radius client IP address should be the AP’s IP address if the server is located into the same segment as the access point. If a gateway is located between the AP and server, Radius client IP should be the gateway IP address.
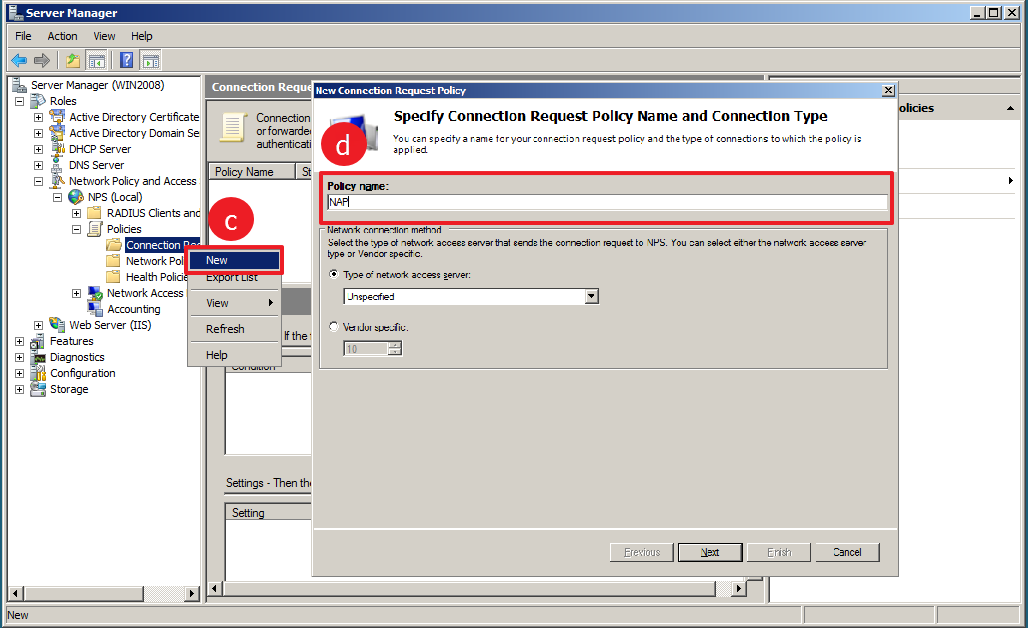
c) Create the connection request policies following the path: Role > Network Policy and Access Services > NPS(local) > Policies, right-click on Connection request policies and select New.
d) In the following window that pops-up, define a Policy name and click next
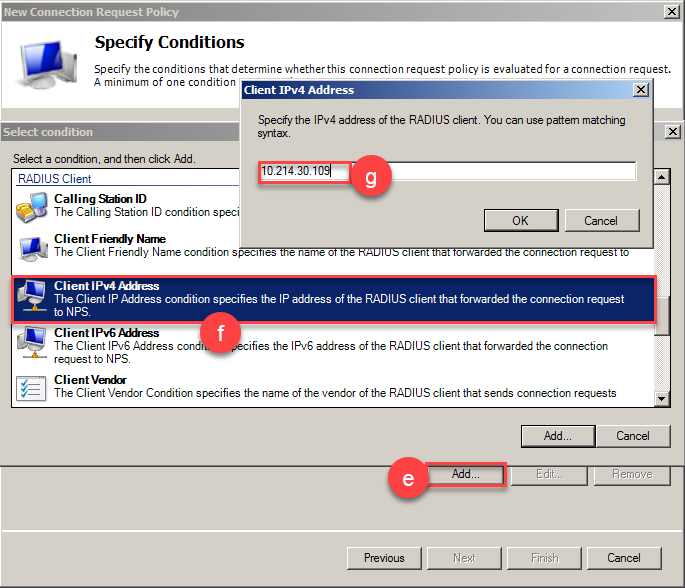
e) In the following window, click the Add button located in the bottom part and another window will appear.
f) Scroll down to RADIUS Client section and select Client IPv4 Address and click add. User can specify more details about the Radius client if necessary.
g) Type the IP address of the radius client and click Ok.
h) Click Next (x4) button for the following steps and finally click Finish.
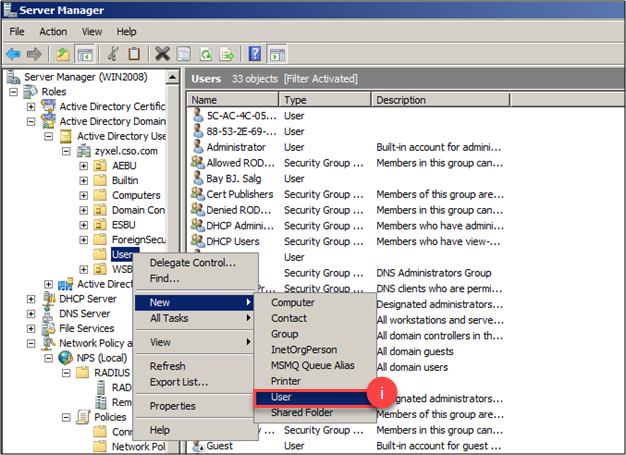
i) Now that you have created the policies to handle requests, it is necessary to define the users in the domain following the path: Active Directory Domain Services > Active Directory Users and Computers > Select the domain configured, right-click on Users folder and select New > User
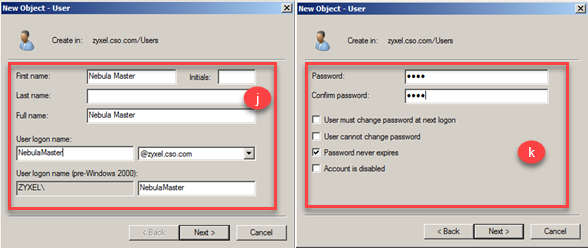
j) A new window will be displayed in which it is necessary to input user information as First Name and User logon name selecting a the respective domain, and click Next.
k) The following step requires inputting the password and user is able to customize account access settings.
l) By clicking Next and Finish buttons, the configuration to authenticate using Radius server is finished.
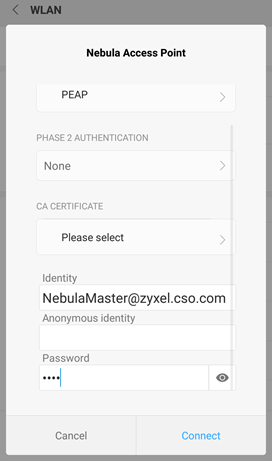
3. Authenticate using Android device
Select the SSID network that has been configured to authenticate using My RADIUS server. Input the email in Identity text box, and the password in Password field.
Lastly, click Connect and if email/password combination is correct, the client will be successfully connected to the wireless network.
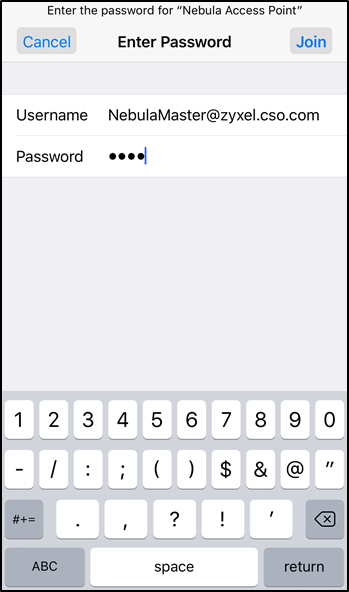
4. Authenticate using iOS device
Select the SSID network that has been configured to authenticate using My RADIUS server
Input the email in Username text box, and the password in Password field.
A message warning about a not trusted certificate will be shown. For iOS, the certificate from NAP to iPhone is using Self-Signed, this certificate is not in iOS trust list. Click Trust on the top-right part and device will be able to connect to the wireless network

For reference: https://support.apple.com/en-us/HT204132
Note: The SSID network needs to be configured in order to apply 802.1X authentication for the clients connecting to the wireless network.
1. Configure the use of 802.1X
Once the SSID is configured, users can enable 802.1X authentication on Nebula at Configure > Access points > SSID advanced settings.
Following the steps:
a) Select the SSID to implement 802.1X from the drop-down list.
b) Select WPA2-Enterprise with My RADIUS Server at Network access.
c) A new section about Radius server will appear by selecting My RADIUS server as option. User needs to input IP address of server host, the port configured (default is UDP 1812 for radius connections) and the secret key also configured in the radius server.
2. Configure domain controller (Windows Server 2008 Enterprise used as example)
In order to use My RADIUS server option, user needs to configure the Radius server and Active Directory roles in the domain controller.
a) Using Windows Server 2008 Enterprise edition, open the Server Manager and use the left panel to get into the path: Role > Network Policy and Access Services > NPS(local) > RADIUS Clients and Servers. Create a radius client by right-click on Radius clients and select New RADIUS Client.
b) A new window will pop-up, user have to specify a name in Friendly name field, the address of the client (IP or DNS) and input the shared secret key (Shared secret and confirm shared secret fields).
Note: Radius client IP address should be the AP’s IP address if the server is located into the same segment as the access point. If a gateway is located between the AP and server, Radius client IP should be the gateway IP address.
c) Create the connection request policies following the path: Role > Network Policy and Access Services > NPS(local) > Policies, right-click on Connection request policies and select New.
d) In the following window that pops-up, define a Policy name and click next
e) In the following window, click the Add button located in the bottom part and another window will appear.
f) Scroll down to RADIUS Client section and select Client IPv4 Address and click add. User can specify more details about the Radius client if necessary.
g) Type the IP address of the radius client and click Ok.
h) Click Next (x4) button for the following steps and finally click Finish.
i) Now that you have created the policies to handle requests, it is necessary to define the users in the domain following the path: Active Directory Domain Services > Active Directory Users and Computers > Select the domain configured, right-click on Users folder and select New > User
j) A new window will be displayed in which it is necessary to input user information as First Name and User logon name selecting a the respective domain, and click Next.
k) The following step requires inputting the password and user is able to customize account access settings.
l) By clicking Next and Finish buttons, the configuration to authenticate using Radius server is finished.
3. Authenticate using Android device
Select the SSID network that has been configured to authenticate using My RADIUS server. Input the email in Identity text box, and the password in Password field.
Lastly, click Connect and if email/password combination is correct, the client will be successfully connected to the wireless network.
4. Authenticate using iOS device
Select the SSID network that has been configured to authenticate using My RADIUS server
Input the email in Username text box, and the password in Password field.
A message warning about a not trusted certificate will be shown. For iOS, the certificate from NAP to iPhone is using Self-Signed, this certificate is not in iOS trust list. Click Trust on the top-right part and device will be able to connect to the wireless network
For reference: https://support.apple.com/en-us/HT204132
Tagged:
0
Categories
- All Categories
- 442 Beta Program
- 3K Nebula
- 234 Nebula Ideas
- 6.7K Security
- 693 USG FLEX H Series
- 365 Security Ideas
- 1.8K Switch
- 87 Switch Ideas
- 1.4K Wireless
- 56 Wireless Ideas
- 7.1K Consumer Product
- 312 Service & License
- 508 News and Release
- 97 Security Advisories
- 31 Education Center
- 10 [Campaign] Zyxel Network Detective
- 5.1K FAQ
- 34 Documents
- 89 About Community
- 114 Security Highlight