How to configure with the Wizard Setting

 Zyxel Employee


This example shows how to get start with Wizard. It will be easier to complete the deployment configuration of the AP and the NXC. The Wizard setting includes Uplink Connection, VLAN Setting and AP Profile. The NXC will be the DHCP server for the stations, and all the guest stations must pass the captive portal authentication. NXC5500 does not support Wizard Setting now.

Figure. Add configuration via Wizard settings.
Note:
All network IP addresses and subnet masks are used as examples in this article. Please replace them with your actual network IP addresses and subnet masks. This example was tested using USG210 (Firmware Version: V4.30), GS2210 (Firmware Version: V4.50), NXC2500 (Firmware Version: 5.40)
1.1 How to configure the Wizard Setting with First login?
1 Change the Password Setting to the private one. Configure the correct Time Setting. Enable Daylight Saving if needed. Click Next.

2 Configure the Uplink Connection which will be connected to the USG as 10.214.30.33/24, and the gateway is USG LAN IP address 10.214.30.1. Add the DNS server as 8.8.8.8. Configure the Management VLAN to manage AP. The default setting IP address is 172.16.1.1/24 and enable DHCP server. Click Next.

3 Add VLAN interfaces for Employee and Guest.
a. Add Interface for Guest. Click Add to create a service VLAN for guests.

b. Set the configuration as below:
Tagged VLAN ID:10,
Guest VLAN is Enable. (Guest VLAN: This field displays if this is a guest VLAN and if the captive portal feature is enabled.)
Restrict Intranet Access: Enable
(Restrict Intranet Access: define the local networks to which wireless clients cannot have access)
Captive Portal: Enable.
Create Dynamic Guest Manager: fill in the guest manager information.
Fill in the IP address, Subnet Mask, and DHCP setting.
Click OK.

c. Add Interface for Employee. Click Add to create a service VLAN for guests.

d. Set the configuration as below:
Tagged VLAN ID: 20
Fill in the IP address, Subnet Mask, and DHCP setting.
Click OK.

e. Click Next.

4 Configure the SSID profile.
a. Edit the SSID profile for Guest
Double click the SSID profile to modify the configuration.

b. Edit the first SSID Profile for Guest VLAN.
Wireless Name (SSID): Guest
Guest VLAN: Enable (it will fill in the Guest VLAN setting automatically.)
Security Mode: WPA2
Pre-Shared Key: 12345678
Click OK.

c. Edit the second SSID Profile for Employee.
Double click the SSID profile to modify the configuration.
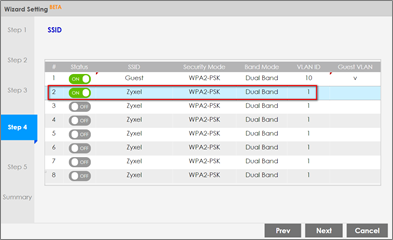
d. Set the configuration as below:
Tagged VLAN ID: 20
Security Mode: WPA2
Pre-Shared Key: 1357924680
Click OK.

e. Click Next.

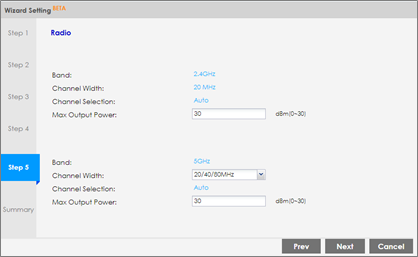
5 Modify the Radio setting for the AP. Adjust the Output Power for both of the channels, and Channel Width for 5GHz.
6 Get the Summary page and confirm if all of the configurations can match to the environment.
If yes, click Save.
If not, click Prev to modify the setting.

7 Here is the page after click Save from item 6.
Click OK. And refresh the browser to re-login.

1.2 Test the Result
Connect NXC P1 to USG LAN, and NXC P2 to Switch. And connect AP to the Switch.
1 Login with guest-manager account.

2 Dynamic Guest User Group: Wiz_Dynamic_Guest
Click Apply.


3 User a station connect to the SSID “Guest” and login with the Guest account. Monitor the account via the Monitor > System Status > Login Users > Login Users.

4 Use a station to connect to the SSID “Employee”.

1.3 What Could Go Wrong?
1 The object which is created by the Wizard cannot be deleted via the web GUI. It must be modified via the Wizard setting again.
2 If there is VLAN ID for the management VLAN, remember to add VLAN on the switch.


Categories
- All Categories
- 442 Beta Program
- 3K Nebula
- 234 Nebula Ideas
- 6.7K Security
- 693 USG FLEX H Series
- 365 Security Ideas
- 1.8K Switch
- 87 Switch Ideas
- 1.4K Wireless
- 56 Wireless Ideas
- 7.1K Consumer Product
- 312 Service & License
- 508 News and Release
- 97 Security Advisories
- 31 Education Center
- 10 [Campaign] Zyxel Network Detective
- 5.1K FAQ
- 34 Documents
- 89 About Community
- 114 Security Highlight