How to Set WiFi Multiple SSID for Office Environment (when USG is DHCP Server)

 Zyxel Employee


- When USG is DHCP Server for VLAN10 and VLAN20
The example instructs how to configure VLANs and set different VLANs for different SSIDs in NXC. In this example, USG is the only DHCP server in the environment, and NXC only needs to set VLAN for passing traffic. In this example, we configure interfaces, set VLANs, create security and SSID profiles, and then configure AP profiles for managed APs.

Figure. Set Different VLANs for Different SSIDs When USG is DHCP Server
Note:
All network IP addresses and subnet masks are used as examples in this article. Please replace them with your actual network IP addresses and subnet masks. This example was tested using USG20v2 (Firmware Version: V4.15), NXC5500 (Firmware Version: 5.40), GS2210-8HP (Firmware Version: V4.30).
1.1 Configure NXC’s Interface to Go to Internet
1 Connect NXC controller to USG LAN port. In the USG, all LAN ports are DHCP server for interface LAN, VLAN10, VLAN20, and all the stations connected to APs get an IP from the USG.
2 In the NXC, go to CONFIGURATION > Network > Interface > VLAN to set the NXC's IP address to be in the same subnet as the USG's LAN IP and have the USG act as the gateway. Double click vlan0 to edit IP Address Assignment section. Click OK.

1.2 Configure VLAN
1 Connect Switch to NXC ge2 (P2), and connect all APs to the switch.
2 In the NXC, go to CONFIGURATION > Network > Interface > VLAN, Click Add to create a new VLAN (VLAN10).

3 In General Settings, check Enable.
In Interface Properties, key in Interface Name: vlan10; set VID: 10
In Member Configuration, set ge2 to be a Member and Tx Tagging to yes.
In IP Address Assignment, Use Fixed IP Address and key in IP Address, Subnet Mask. Click OK.

4 Click Add to create VLAN20 configuration in CONFIGURATION > Network > Interface > VLAN.

5 In General Settings, check Enable.
In Interface Properties, key in Interface Name: vlan20; set VID: 20
In Member Configuration, set ge2 to be a Member and Tx Tagging to yes.
In IP Address Assignment, Use Fixed IP Address and key in IP Address, Subnet Mask. Click OK.

1.3 Configure Security and SSID
1 Go to CONFIGURATION > Object > AP Profile > SSID > Security List, Click Add to create a new security profile for staff.
In General Settings, key in Staff as profile name, and set security mode to wpa2.
In Authentication Settings, select to PSK and key in Pre-shared Key. Click OK.

2 Click Add to create a new security profile for guest.
In General Settings, key in guest as profile name, and set security mode to none. Click OK.

3 Go to CONFIGURATION > Object > AP Profile > SSID > SSID List and click Add to create a SSID for staff.
In Profile Name and SSID, key in Staff.
In Security Profile, select Staff.
In VLAN ID, key in 10. Click OK.

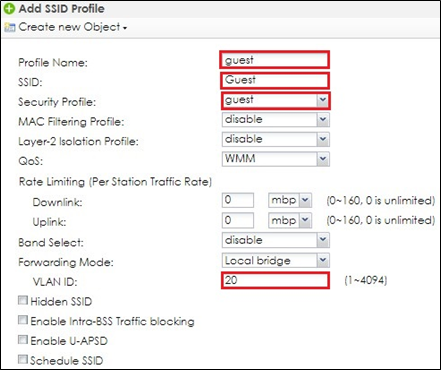
4 Click Add to create a SSID for guest in vlan20.
In Profile Name and SSID, key in guest.
In Security Profile, select guest.
In VLAN ID, key in 20. Click OK.
1.4 Configure AP Profile to Broadcast SSID
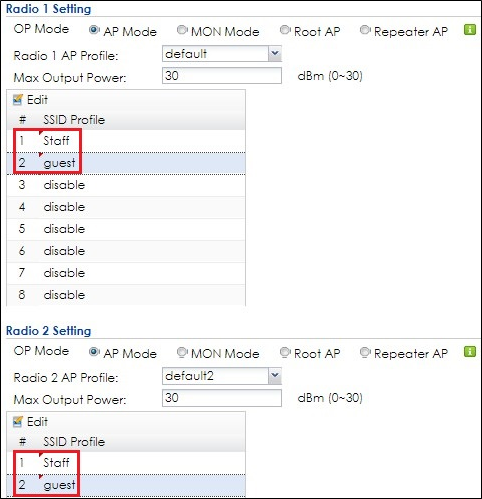
1 Go to CONFIGURATION > Wireless > AP Management > AP Group, click Edit for default group.
In Radio 1 and Radio 2, set the SSID profile, Staff and guest. Click OK to apply the configuration.


Categories
- All Categories
- 442 Beta Program
- 3K Nebula
- 223 Nebula Ideas
- 129 Nebula Status and Incidents
- 6.6K Security
- 628 USG FLEX H Series
- 353 Security Ideas
- 1.8K Switch
- 85 Switch Ideas
- 1.4K Wireless
- 54 Wireless Ideas
- 7K Consumer Product
- 299 Service & License
- 492 News and Release
- 92 Security Advisories
- 31 Education Center
- 10 [Campaign] Zyxel Network Detective
- 4.8K FAQ
- 34 Documents
- 88 About Community
- 108 Security Highlight