Captive Portal – External Portal

 Zyxel Employee


USG FLEX H Series Firewall has introduced support for External Captive Portals in its latest firmware updates, giving administrators the freedom to design and host their own custom login pages. This feature is especially valuable for businesses, hotels, schools, and public venues seeking a branded, flexible authentication experience.
This article walks through how the External Portal option works, how to configure it, and how traffic flows between clients and the firewall during authentication.
1. What Is an External Captive Portal?
By default, Captive Portal uses internal hosting, where the login page is served directly by the firewall. With the new External Portal option, administrators can redirect users to a custom web server for authentication.
2. How to Configure an External Portal
To configure the firewall for external portal redirection:
- Go to Captive Portal > Authentication Policy > Policy
- Under Portal Type, select External
- Enter the URL of your external web server (e.g., https://yourwebserver.com/portal.html)
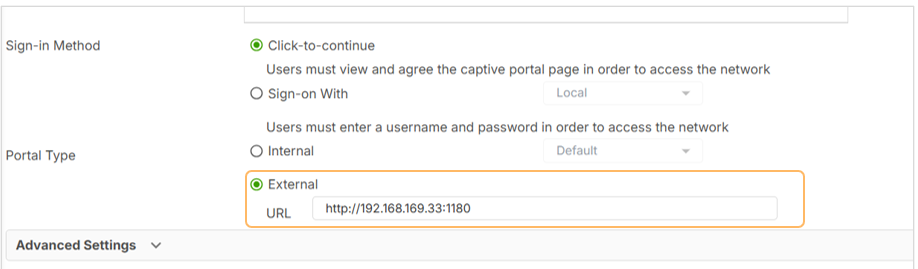
Note: The external portal must be designed to handle HTTP requests and relay successful authentication responses back to the firewall.
3. External Portal Template Files
Zyxel provides sample HTML templates for building your own external login pages.
- It is not available for download directly from the firewall.
- Planned future support to download templates from Nebula Cloud
4. Traffic Flow: How External Portal Redirection Works
Here's how traffic flows when Click to Continue is used with an External Portal:
- Client access the internet via a browser
- The firewall redirects HTTP requests to a default IP (typically 6.6.6.6)
- Firewall then forwards the request to the external portal URL
- The external page loads in the client’s browser
- User clicks the “Agree” button on the custom page
- The page sends a confirmation request back to the firewall
- Firewall validates the request, authenticates the client
- Client is allowed internet access
This flow ensures that user traffic is authenticated and still processed through the firewall, even though the login page is hosted externally.
5. Understanding the External Portal URL Structure
When redirected to the external portal, the URL seen in the browser has several components:
Example URL Structure: http://192.168.169.33:1180/?url=https%3A%2F%2F6.6.6.6%3A1443/CP_agree.cgi&mp_idx=cp1
- http://192.168.169.33:1180: IP or domain of your external portal
- 6.6.6.6: IP of the firewall's redirect server, it is the callback URL.
- CP_agree.cgi: Script used to communicate back to the firewall for authentication
- cp1, cp2, etc.: Identifier for the Captive Portal policy rule being used
These components allow the firewall to track the session and apply the correct Captive Portal rules during and after authentication
Categories
- All Categories
- 442 Beta Program
- 3K Nebula
- 228 Nebula Ideas
- 130 Nebula Status and Incidents
- 6.6K Security
- 647 USG FLEX H Series
- 357 Security Ideas
- 1.8K Switch
- 86 Switch Ideas
- 1.4K Wireless
- 55 Wireless Ideas
- 7.1K Consumer Product
- 304 Service & License
- 496 News and Release
- 93 Security Advisories
- 31 Education Center
- 10 [Campaign] Zyxel Network Detective
- 5K FAQ
- 34 Documents
- 89 About Community
- 110 Security Highlight