Using Smart/guest VLAN Feature to Ensure Proper Network Setup Across Devices

 Zyxel Employee


Nebula Control Center introduced this intelligent feature in October 2019, bringing even more easiness while settings up your networks from the Access point up to the NSG or vice-versa, and making sure that everything is well set and ready by doing sanity checks.
Smart/guest VLAN network can be enabled on Site-wide > Configure > General settings, only available in the new Nebula 2.0 interface. It is disabled in existing sites created prior its release, and enabled by default for new sites created afterwards.

Here are the options or scenarios covered in Smart/guest VLAN network:
Setting up a SSID with its VLAN interface
Scenario: you are setting up a Wireless network with a VLAN that hasn't been created on the NSG installed in the site.
Devices involved: NSG, Nebula managed AP(s).
Location: Access point > Configure > Authentication
Smart VLAN tip:
- The tip is shown after input a VLAN ID in the SSID Authentication page, which corresponding VLAN interface on the NSG of the same site does not exist yet.

- Clicking on “here” will open up a window where you can easily configure the VLAN interface on the NSG, including IP addressing, DCHP settings and Guest access.
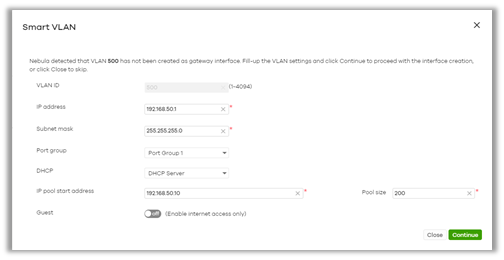
- Click Continue to keep the changes in cache and apply them while Saving the settings in the SSID Authentication page
Note: Smart/guest VLAN network only considers VLAN tagged traffic. By default, VLAN ID 1 is considered as the LAN 1/2 interfaces (untagged traffic), therefore no Smart VLAN tip will be displayed.
Enabling Guest network on SSID
Scenario: turn on “Guest network” (L2 isolation) on an existing SSID which corresponding VLAN interface in the NSG is already created but “Guest” function is not enabled.
Devices involved: NSG, Nebula managed AP(s).
Location: Access point > Configure > SSID overview
Smart VLAN tip:
- The tip is shown after turning on the “Guest network” and VLAN interface in the NSG has “Guest” function turned off.

- Clicking on “here” will open up a window where you can decide to configure the NSG VLAN interface as Guest.

- Guest function will limit the VLAN interface to internet access only, as a complement for L2 isolation, therefore, it is not recommended to be enabled in LAN interfaces used for device management, a VLAN that is also being used by a non-guest SSID, or a VLAN used in non-guest wired connections. For more details about Guest network and Guest VLAN interface, please check here.
Note: by default, LAN interfaces will be used for device management, hence, Smart VLAN tip will not be shown when having VLAN ID 1.
Enabling Guest in NSG VLAN interface.
Scenario: turn on “Guest” on an existing NSG VLAN interface will automatically enable “Guest network” on existing SSIDs using the same VLAN ID.
Devices involved: NSG, Nebula managed AP(s).
Location: Security gateway > Configure > Interface addressing
Smart VLAN tip:
- The tip is shown after turning on the “Guest” for a NSG VLAN interface and there is one or multiple SSIDs that are using the same VLAN ID.
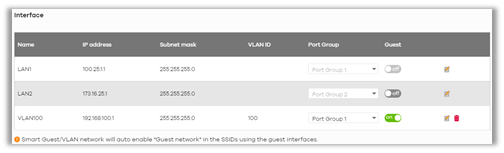
- The “Guest network” will be automatically enabled on those SSIDs, to ensure that your guest networks are properly configured and isolated in both L2 and L3. If by any case, you don’t wish to enable Guest network in the SSID, just proceed to disable it in SSID overview page after saving settings changes in gateway Interface addressing.
Note: by default, LAN interfaces will be used for device management, hence, this Smart VLAN automation will not apply to LAN 1/2 interfaces.
Making changes to the NSG VLAN interface
Scenario: modify the VLAN ID of an existing VLAN interface which is being used by one or multiple SSIDs.
Devices involved: NSG, Nebula managed AP(s).
Location: Security gateway > Configure > Interface addressing
Smart VLAN tip:
- Once you have modified the VLAN ID of the NSG VLAN interface(s) which is being used by one or multiple SSIDs, the following pop-up window will appear when clicking the Save button:

- The pop-up warns you about SSIDs using the original VLAN ID, and doing the change might cause an interruption of the service. You could ignore this warning and proceed to save changes with Continue button, or conveniently choose to automatically update these SSIDs settings with the new VLAN ID by clicking Update SSID & continue button, ensuring wireless service at all times.
Deleting a NSG VLAN interface
Scenario: delete a VLAN interface which is being used by one or multiple SSIDs.
Devices involved: NSG, Nebula managed AP(s).
Location: Security gateway > Configure > Interface addressing
Smart VLAN tip:
- Once you have deleted NSG VLAN interface(s) which is being used by one or multiple SSIDs, the following pop-up window will appear when clicking the Save button:

- The pop-up warns you about SSIDs using the VLAN interface(s), and doing the change might cause an interruption of the service. You could ignore this warning and proceed to save changes with Continue button, or choose not to apply changes by click on the Close button.
As pointed out, the Smart/guest VLAN network feature helps you to ensure your network is up and running even while doing changes, and reducing the steps needed for cross-devices settings. However, the feature covers the common scenarios and might not be helpful for advanced network deployments. As example, the Smart VLAN tip does not cover switch port settings, as by default, Nebula switches are configured with trunk ports and allowing all VLANs.
If you would like to see more options covered, we are always happy to get more ideas from your side!
Categories
- All Categories
- 442 Beta Program
- 3K Nebula
- 234 Nebula Ideas
- 6.7K Security
- 693 USG FLEX H Series
- 365 Security Ideas
- 1.8K Switch
- 87 Switch Ideas
- 1.4K Wireless
- 56 Wireless Ideas
- 7.1K Consumer Product
- 312 Service & License
- 508 News and Release
- 97 Security Advisories
- 31 Education Center
- 10 [Campaign] Zyxel Network Detective
- 5.1K FAQ
- 34 Documents
- 89 About Community
- 114 Security Highlight