Setting Up VPN Connections on Nebula and End Devices to Enable a Secure Connectivity for Remote Work
 Zyxel Employee


The world is going through a difficult time due to the impact of the COVID-19 outbreak, many businesses have no choice but to close their physical offices and have their employees work from home. While working from home is becoming essential, network administrators have to work harder to provide everyone with the right connectivity that will allow them to have access to the intranet tools needed to perform their job efficiently, thus, leading to a rapid increase of the use of remote VPNs.
The Nebula solution and its NSG device series provide a number of VPN options that not only provide the right connectivity but also ensures the traffic is being securely encrypted from end-to-end, alleviating the concerns of insecure/unencrypted home networks that the administrator cannot control.
This article will guide you to configure these options in the Nebula Control Center and the most common end devices.
IPsec client VPN
This option allows the use of the Zyxel VPN client software (“SecuExtender”), which enables fast 3-step connection wizard that highly improves the user experience.
Setting it up on Nebula Control Center
1. Setting up the VPN on the NSG settings is simple as the following details.
Location: Configure > Security gateway > Remote access VPN
A. Once located in the page pointed above, set the Client VPN server as IPSec client and the needed fields will be displayed.
B. Choose the WAN interface that will be used for the connection. If the NSG is located behind another gateway, you will need to type NAT traversal with the public IP and configure the port forwarding (UDP port 500 and 4500) in the edge gateway.
C. Input the subnet (CIDR notation) that will be assigned to those clients connecting to the VPN. Bear in mind that this is like another network interface in your gateway, therefore, it cannot be repeated with the existing networks. Optionally, firewall rules can be applied to this network to restrict the network access.
D. If specific resources on the intranet should be accessed, it is recommended to use LAN interface of the NSG as custom nameserver IP address.
E. Define the pre-shared key used to build the VPN tunnel. This key should be exactly the same when setting up the client device.
F. Select the Database source that will be used as authentication. The list will include Nebula Cloud Authentication, and Radius/AD server connections configured in the Security Gateway > Gateway settings page.
G. This direct access links to the Zyxel website where you can download the Zyxel VPN client software to be installed in the user that will connect using the VPN.
2. Nebula provides a cloud authentication database hosted on the cloud, so you don’t need to worry about having local servers or paying an online service.
Location: Organization-wide/Site-wide > Cloud authentication
Select the User and use the +Add or Import option to create user accounts. Users will need to input the Email/Username and password set on this page to authenticate. An email that includes the credential information will be sent to the user.
Note: accounts should be authorized in the site and not expired in order to be use.
3. As the Zyxel Client VPN will be used on the user’s laptop, it is necessary to enable the access of port 443 in the NSG so the Client VPN can get the settings from the device, making it simple for users to set up.
Location: Security Gateway > Firewall
On Web service access, you can specify all the public IPs (user side) that will be connecting to the device or type “any”.
Note: if the NSG is located behind another gateway, you will need to configure the port forwarding (TCP 443) in the edge gateway.
Setting up the Zyxel Client VPN in the user Windows laptop
4. First, the latest version of the Zyxel Client VPN software should be downloaded from the official Zyxel Download Library. The link is obtained from NCC (step 1.G) or you can go here.
After installing and executing it, a small window that shows the existing connections will be shown. Click on the menu icon to open the VPN Main configuration panel.
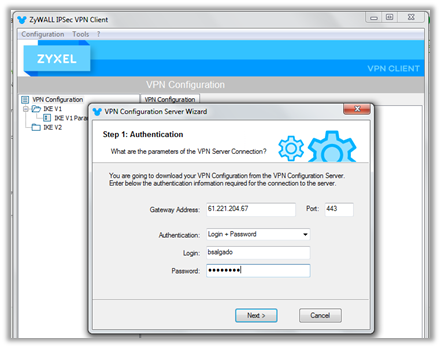
5. Click on Configuration > Get from Server to initiate the 3-step connection wizard.
Step-1 only requires to input the NSG public IP address and the account login details.
Step-2 and Step-3 include the connection to the gateway and the setup of the VPN connection, without the need of user’s input.
After the setup is completed, go into the newly created “IPSEC_Client_VPN” tunnel settings and make sure that the IPsec > Addresses > Subnet mask is filled with 255.255.255.0
Alternatively, the VPN tunnel can be configured manually by using the steps detailed here.
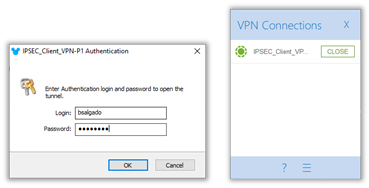
6. To connect, it is only necessary to double click on IPSEC_Client_VPN tunnel and a pop-up to input the credentials will be shown. Use the credential configure in step #2, also obtained by email and the VPN will connect successfully, having access to the company’s network.
L2TP over IPSec
Setting it up on Nebula Control Center
1. Setup the VPN on the NSG settings is simple as the following details.
Location: Configure > Security gateway > Remote access VPN
A. Once located in the page pointed above, set the Client VPN server as L2TP over IPSec client and the needed fields will be displayed.
B. Input the subnet (CIDR notation) that will be assigned to those clients connecting to the VPN. Bear in mind that this is like another network interface in your gateway, therefore, it cannot be repeated with the existing networks. Optionally, firewall rules can be applied to this network to restrict the network access.
C. If specific resources on the intranet should be accessed, it is recommended to use LAN interface of the NSG as custom nameserver IP address.
D. Define the pre-shared key used to build the VPN tunnel. This key should be exactly the same when setting up the client device.
E. Select the Database source that will be used as authentication. The list will include Nebula Cloud Authentication, and Radius/AD server connections configured in the Security Gateway > Gateway settings page.
Note: If the NSG is located behind another gateway, you will need to configure the port forwarding (UDP port 500 and 4500) in the edge gateway.
2. As mentioned in the step #2 in the IPsec Client VPN setup, Nebula provides a cloud database service that can be used to greatly simplify the VPN implementation.
Setting up the L2TP VPN on iOS Smartphone
3. Go to the phone Settings > General > VPN > Add VPN Configuration, and Click Add VPN Connection.
- Select type: L2TP.
- Enter VPN Server IP address, the NSG WAN IP in this case.
- Enter Account and Password that were created on NCC Cloud Authentication-VPN User.
- Enter the same Secret that is setup for the L2TP over IPsec setting.
- Save.
For MAC OS steps details, the steps to follow can be found here.
4. After save, in VPN page, Turn ON Status and the VPN will connect successfully, having access to the company’s network.
Setting up the L2TP VPN on Android Smartphone
5. Go to phone Settings > VPN (path might vary), and click Add VPN.
- Select type: L2TP/IPSec PSK
- Enter Server IP address, the NSG WAN IP in this case.
- Under IPSEC pre-shared key enter the same Secret that is setup for the L2TP over IPsec setting.
- Enter Username and Password that were created on NCC Cloud Authentication-VPN User.
- Save.
6. After save, in VPN page, Turn ON Status and the VPN will connect successfully, having access to the company’s network.
Monitoring the VPN clients on NCC
Admins can go into Security gateway > VPN Connections > Client to site VPN login account to check what the users are currently connected.
Categories
- All Categories
- 442 Beta Program
- 2.9K Nebula
- 217 Nebula Ideas
- 127 Nebula Status and Incidents
- 6.5K Security
- 581 USG FLEX H Series
- 344 Security Ideas
- 1.7K Switch
- 84 Switch Ideas
- 1.4K Wireless
- 52 Wireless Ideas
- 7K Consumer Product
- 297 Service & License
- 476 News and Release
- 91 Security Advisories
- 31 Education Center
- 10 [Campaign] Zyxel Network Detective
- 4.8K FAQ
- 34 Documents
- 87 About Community
- 102 Security Highlight


