How to Deploy SSL VPN with Windows 10 Operating System
Options

Zyxel_Charlie
Posts: 1,034  Zyxel Employee


Zyxel Employee
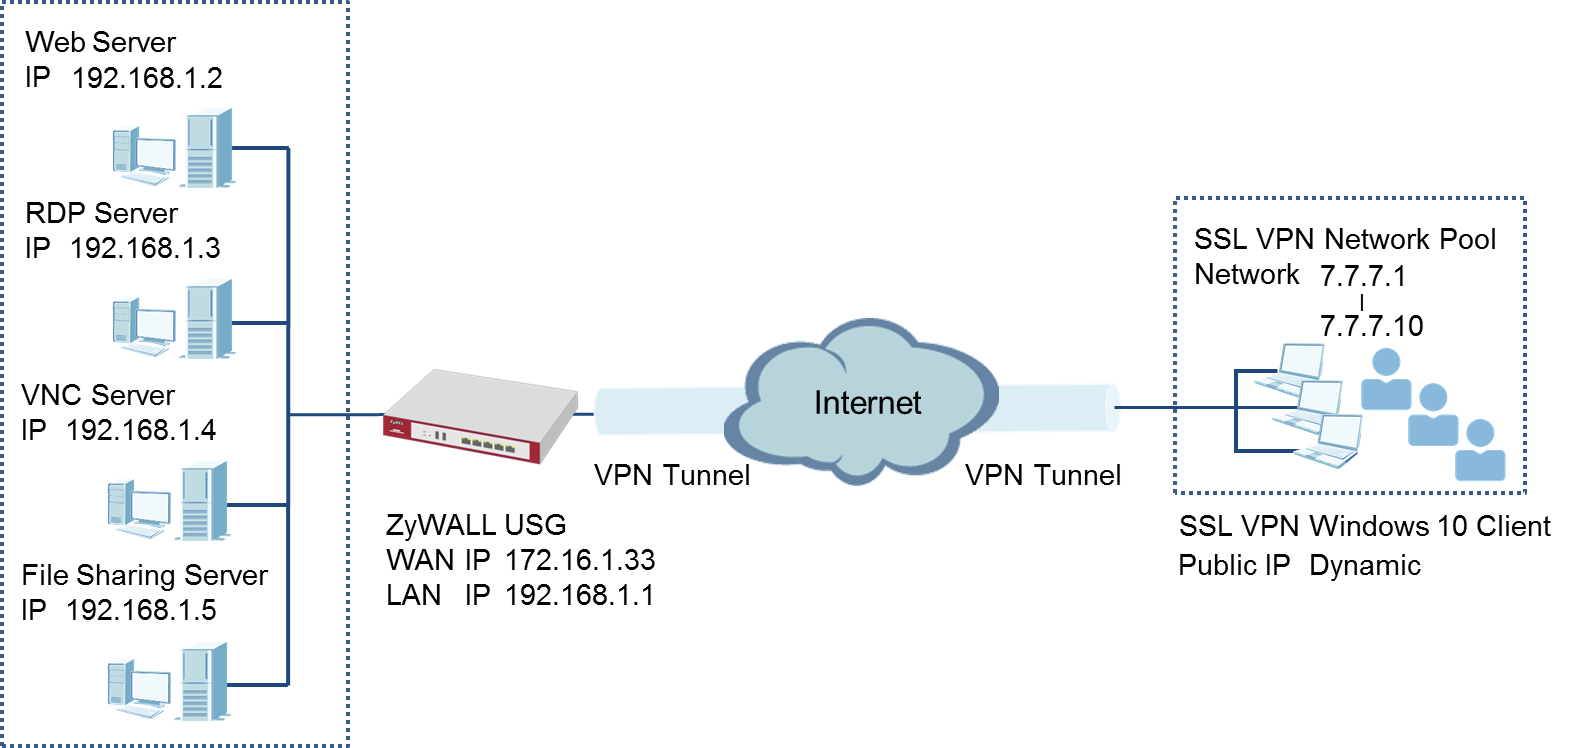
This is an example of using the ZyWALL/USG SSL VPN client software in Windows 10 operating systems for secure connections to the network behind the ZyWALL/USG. When the VPN tunnel is configured, users can securely access the network from a Windows 10 computer.
Note:
All network IP addresses and subnet masks are used as examples in this article. Please replace them with your actual network IP addresses and subnet masks. This example was tested using ZyWALL110 (Firmware Version: ZLD 4.13) and Windows 10 Pro (Version: 10.0.10240).
SETUP/STEP BY STEP PROCEDURE:
Step 1: Set Up the SSL VPN Tunnel on the ZyWALL/USG
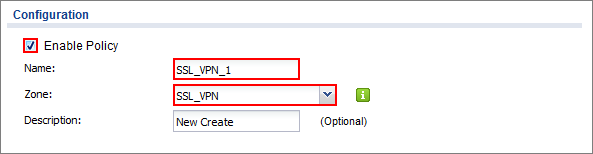
1 In the ZyWALL/USG, go to CONFIGURATION > VPN > SSL VPN > Access Privilege to add an Access Policy. Configure a Name for you to identify the SSL VPN configuration.
CONFIGURATION > VPN > SSL VPN > Access Privilege > Access Policy > Configuration
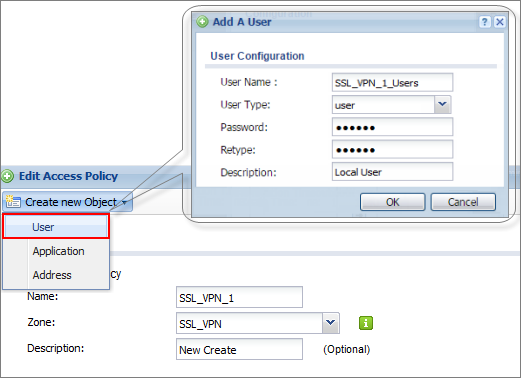
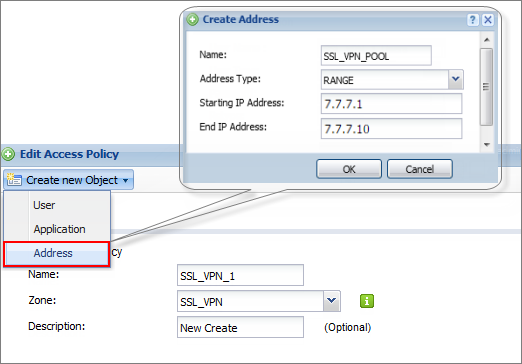
2 Go to Create new Object > User to add User Name (SSL_VPN_1_Users in this example) and Password (4-24 characters, zyx168 in this example), click OK.
CONFIGURATION > VPN > SSL VPN > Access Privilege > Access Policy > Create new Object > User
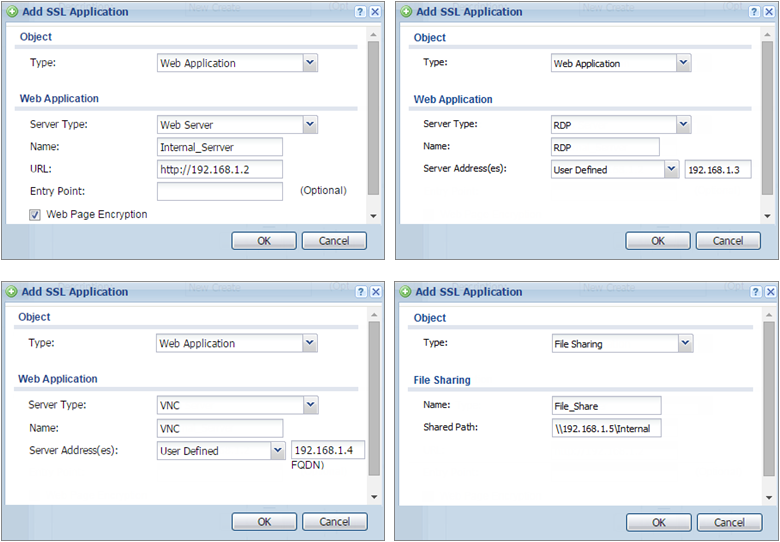
3 Go to Create new Object > Application to add servers that you will allow SSL_VPN_1_Users to access, click OK.
CONFIGURATION > VPN > SSL VPN > Access Privilege > Access Policy > Create new Object > Application
4 Go to Create new Object > Address to add IP address pool for SSL_VPN_1_Users.
CONFIGURATION > VPN > SSL VPN > Access Privilege > Access Policy > Create new Object > Address
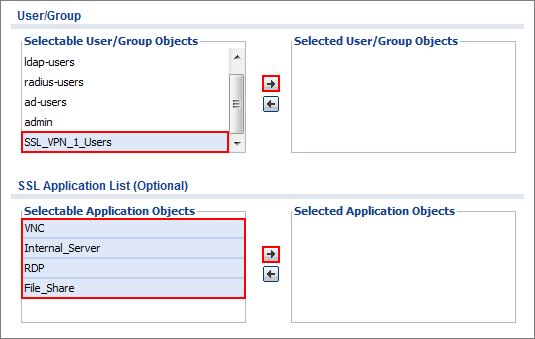
5 Then, move the just created address object to Selected User/Group Objects. Similarly, in SSL Application List (Optional) move the servers you want available to SSL users to Selected Appellation Objects.
CONFIGURATION > VPN > SSL VPN > Access Privilege > Access Policy > User/Group & SSL Application
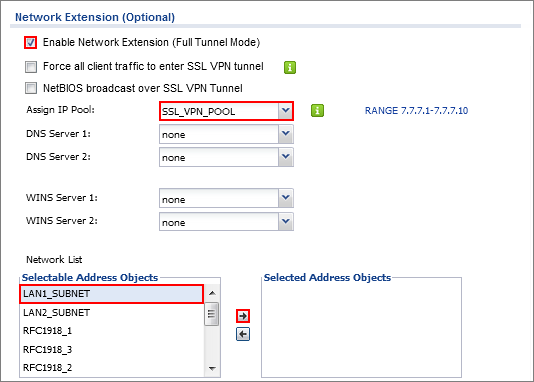
6 Scroll down to Network Extension (Optional) to select Enable Network Extension option to allow the users to access the resources behind the ZyWALL/USG local network.
Select network(s) name in the Selectable Address Objects list and click the right arrow button to add to the Selected Address Objects list. You can select more than one network.
CONFIGURATION > VPN > SSL VPN > Access Privilege > Access Policy > Network Extension (Optional)
Step 2: Set Up the SSL VPN Tunnel on the Windows 10 Operating System
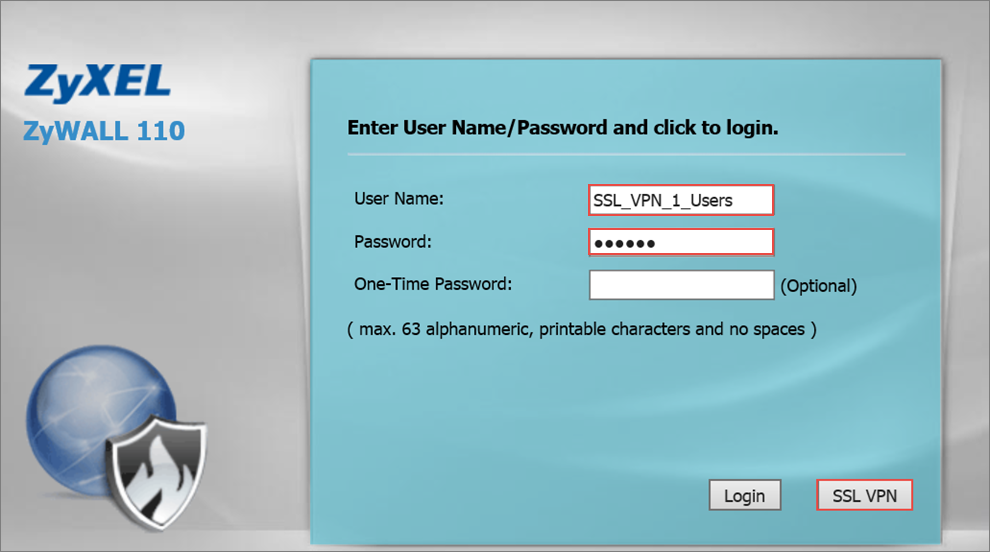
1 Type the ZyWALL/USG’s WAN IP into the browser, then the login screen appears. Enter User Name and Password to be the same as your ZyWALL/USG SSL VPN Selected User/Group name and password (SSL_VPN_1_Users/zyx168 in this example). Click SSL VPN.
2 The Welcome dialog box appears. Click OK to start ZyWALL SecuExtender installation.
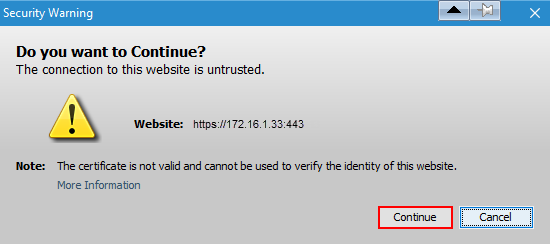
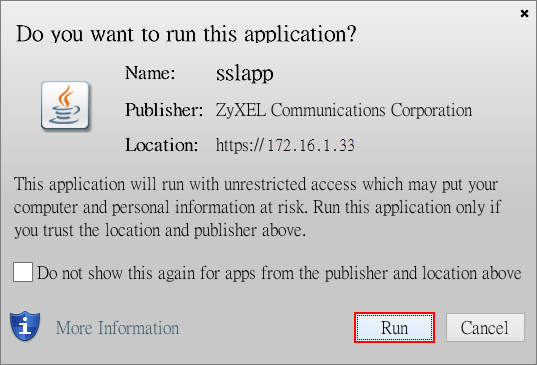
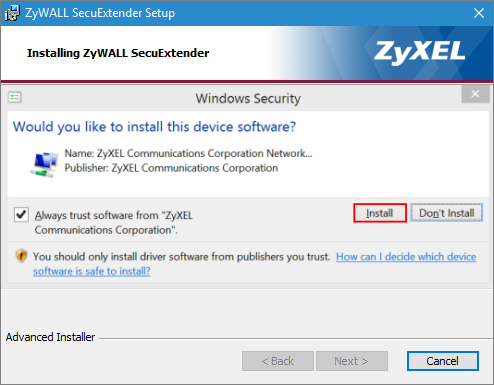
Click Continue if you see Security Warning. Click Run.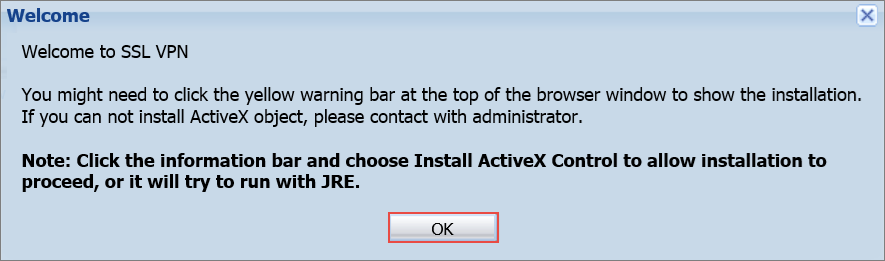
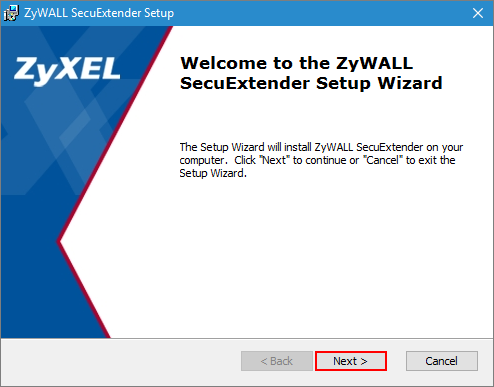
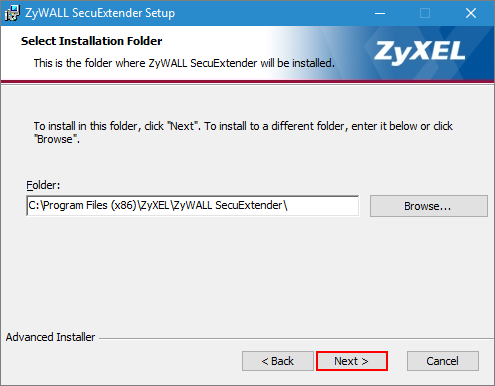
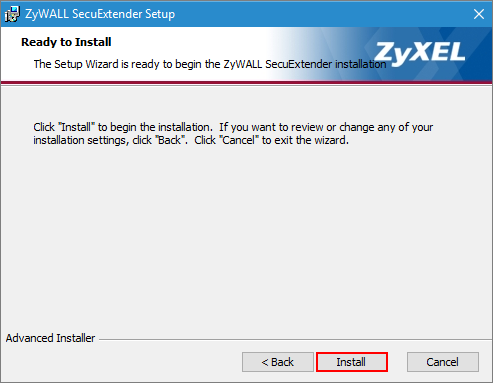
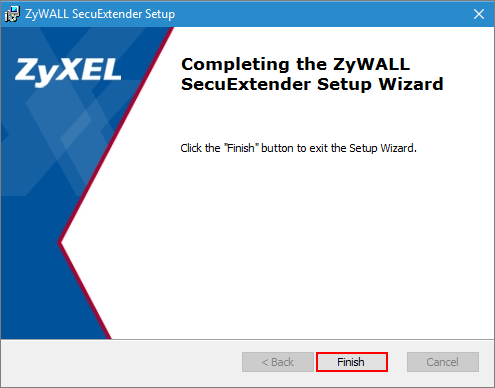
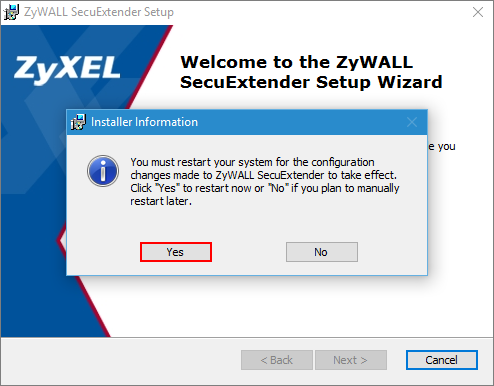
3 The ZyWALL SecuExtender Setup Wizard dialog box appears. Click Next and Install to complete the installation. Then, click Yes to restart your system with the configuration changes or No if you plan to manually restart later.
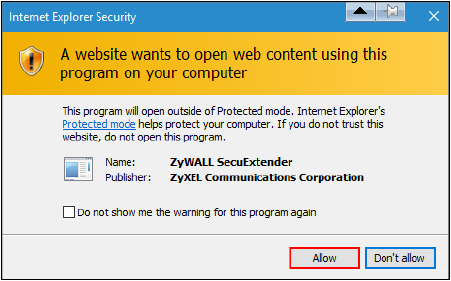
4 After restart your system. Type ZyWALL/USG’s WAN IP into the browser, to display the login screen. Enter User Name and Password to be the same as your ZyWALL/USG SSL VPN Selected User/Group name and password (SSL_VPN_1_Users/zyx168 in this example). Click SSL VPN. Click Allow if you see Internet Explorer Security warning.
VERIFICATION:
Test the SSL VPN Tunnel
1 Go to ZyWALL/USG MONITOR > VPN Monitor > SSL and verify the tunnel Login Address, Connected Time and the Inbound(Bytes)/Outbound(Bytes) traffic.
MONITOR > VPN Monitor > SSL > SSL_VPN_1_Users

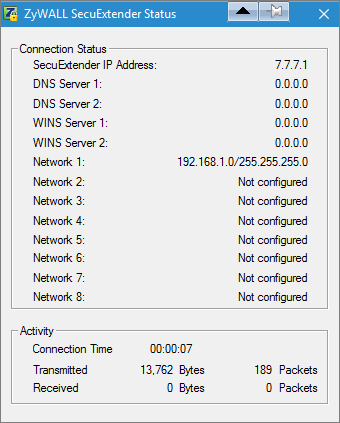
2 Go to Windows 10 ZyWALL SecuExtender Status, you can check Connection Status, Connect Time, Transmitted and Received traffic.
ZyWALL SecuExtender Status
What Can Go Wrong?
1 If you see [notice] or [alert] log message such as below, please check ZyWALL/USG SSL Selected User/Group Objects settings. Windows 10 users must use the same Username and Password as configured in ZyWALL/USG to establish the SSL VPN tunnel.

2 If you uploaded a logo to show in the SSL VPN user screens but it does not display properly, check that the logo graphic is in GIF, JPG, or PNG format. The graphic should use a resolution of 103 x 29 pixels to avoid distortion when displayed. The ZyWALL/USG automatically resizes a graphic of a different resolution to 103 x 29 pixels. The file size must be 100 kilobytes or less. Transparent background is recommended.
3 If users can log into the SSL VPN but cannot see some of the resource links check the SSL application object’s configuration.
4 If the ZyWALL/USG redirects the user to the user aware screen, check whether the user account is included in an SSL VPN access policy or not.
5 Changing the HTTP/HTTPS configuration disconnects SSL VPN network extension sessions. Users need to re-connect if this happens.
ZyWALL/USG SSL VPN with Windows 10
Note:
All network IP addresses and subnet masks are used as examples in this article. Please replace them with your actual network IP addresses and subnet masks. This example was tested using ZyWALL110 (Firmware Version: ZLD 4.13) and Windows 10 Pro (Version: 10.0.10240).
SETUP/STEP BY STEP PROCEDURE:
Step 1: Set Up the SSL VPN Tunnel on the ZyWALL/USG
1 In the ZyWALL/USG, go to CONFIGURATION > VPN > SSL VPN > Access Privilege to add an Access Policy. Configure a Name for you to identify the SSL VPN configuration.
CONFIGURATION > VPN > SSL VPN > Access Privilege > Access Policy > Configuration
2 Go to Create new Object > User to add User Name (SSL_VPN_1_Users in this example) and Password (4-24 characters, zyx168 in this example), click OK.
CONFIGURATION > VPN > SSL VPN > Access Privilege > Access Policy > Create new Object > User
3 Go to Create new Object > Application to add servers that you will allow SSL_VPN_1_Users to access, click OK.
CONFIGURATION > VPN > SSL VPN > Access Privilege > Access Policy > Create new Object > Application
4 Go to Create new Object > Address to add IP address pool for SSL_VPN_1_Users.
CONFIGURATION > VPN > SSL VPN > Access Privilege > Access Policy > Create new Object > Address
5 Then, move the just created address object to Selected User/Group Objects. Similarly, in SSL Application List (Optional) move the servers you want available to SSL users to Selected Appellation Objects.
CONFIGURATION > VPN > SSL VPN > Access Privilege > Access Policy > User/Group & SSL Application
6 Scroll down to Network Extension (Optional) to select Enable Network Extension option to allow the users to access the resources behind the ZyWALL/USG local network.
Select network(s) name in the Selectable Address Objects list and click the right arrow button to add to the Selected Address Objects list. You can select more than one network.
CONFIGURATION > VPN > SSL VPN > Access Privilege > Access Policy > Network Extension (Optional)
Step 2: Set Up the SSL VPN Tunnel on the Windows 10 Operating System
1 Type the ZyWALL/USG’s WAN IP into the browser, then the login screen appears. Enter User Name and Password to be the same as your ZyWALL/USG SSL VPN Selected User/Group name and password (SSL_VPN_1_Users/zyx168 in this example). Click SSL VPN.
2 The Welcome dialog box appears. Click OK to start ZyWALL SecuExtender installation.
Click Continue if you see Security Warning. Click Run.
3 The ZyWALL SecuExtender Setup Wizard dialog box appears. Click Next and Install to complete the installation. Then, click Yes to restart your system with the configuration changes or No if you plan to manually restart later.
4 After restart your system. Type ZyWALL/USG’s WAN IP into the browser, to display the login screen. Enter User Name and Password to be the same as your ZyWALL/USG SSL VPN Selected User/Group name and password (SSL_VPN_1_Users/zyx168 in this example). Click SSL VPN. Click Allow if you see Internet Explorer Security warning.
VERIFICATION:
Test the SSL VPN Tunnel
1 Go to ZyWALL/USG MONITOR > VPN Monitor > SSL and verify the tunnel Login Address, Connected Time and the Inbound(Bytes)/Outbound(Bytes) traffic.
MONITOR > VPN Monitor > SSL > SSL_VPN_1_Users
2 Go to Windows 10 ZyWALL SecuExtender Status, you can check Connection Status, Connect Time, Transmitted and Received traffic.
ZyWALL SecuExtender Status
What Can Go Wrong?
1 If you see [notice] or [alert] log message such as below, please check ZyWALL/USG SSL Selected User/Group Objects settings. Windows 10 users must use the same Username and Password as configured in ZyWALL/USG to establish the SSL VPN tunnel.
2 If you uploaded a logo to show in the SSL VPN user screens but it does not display properly, check that the logo graphic is in GIF, JPG, or PNG format. The graphic should use a resolution of 103 x 29 pixels to avoid distortion when displayed. The ZyWALL/USG automatically resizes a graphic of a different resolution to 103 x 29 pixels. The file size must be 100 kilobytes or less. Transparent background is recommended.
3 If users can log into the SSL VPN but cannot see some of the resource links check the SSL application object’s configuration.
4 If the ZyWALL/USG redirects the user to the user aware screen, check whether the user account is included in an SSL VPN access policy or not.
5 Changing the HTTP/HTTPS configuration disconnects SSL VPN network extension sessions. Users need to re-connect if this happens.
Tagged:
0
Categories
- All Categories
- 442 Beta Program
- 3K Nebula
- 234 Nebula Ideas
- 6.7K Security
- 691 USG FLEX H Series
- 365 Security Ideas
- 1.8K Switch
- 87 Switch Ideas
- 1.4K Wireless
- 56 Wireless Ideas
- 7.1K Consumer Product
- 312 Service & License
- 508 News and Release
- 97 Security Advisories
- 31 Education Center
- 10 [Campaign] Zyxel Network Detective
- 5.1K FAQ
- 34 Documents
- 89 About Community
- 114 Security Highlight