What do I do if I forget the administrator password?
Options
JasonTsai
Posts: 104  Zyxel Employee


 Zyxel Employee


NOTE: The following steps below will reset the configuration to default, please backup the configuration at all times.
For the smart manage devices GS1900 & GS1920 series, please push the "Reset" button for 10 seconds to restore the factory default settings.
The following figures show the front panel reset button of GS1900 series Switch.
Figure 1 Front Panel: GS1900-8

Figure 2 Front Panel: GS1900-8HP
Revision A1

Revision B1

Figure 3 Front Panel: GS1900-10HP

Figure 4 Front Panel: GS1900-16

Figure 5 Front Panel: GS1900-24E

Figure 6 Front Panel: GS1900-24

Figure 7 Front Panel: GS1900-24HP

Figure 8 Front Panel: GS1900-48

Figure 9 Front Panel: GS1900-48HP

The following figures show the side panels reset button of GS1920 series Switch.
Figure 10 Side Panel: GS1920-48

Figure 11 Side Panel: GS1920-24, GS1920-24HP & GS1920-48HP

For the layer 2 and layer 3 managed switch please refer to the following steps:
1. Connect to http://www.zyxel.com/support/download_landing.shtml and download the firmware file of the device.
2. Connect a console cable to the switch.
3. Open Tera term software through the operating system.
4. Power up the switch then enters debug mode.
Figure 12 Debug mode

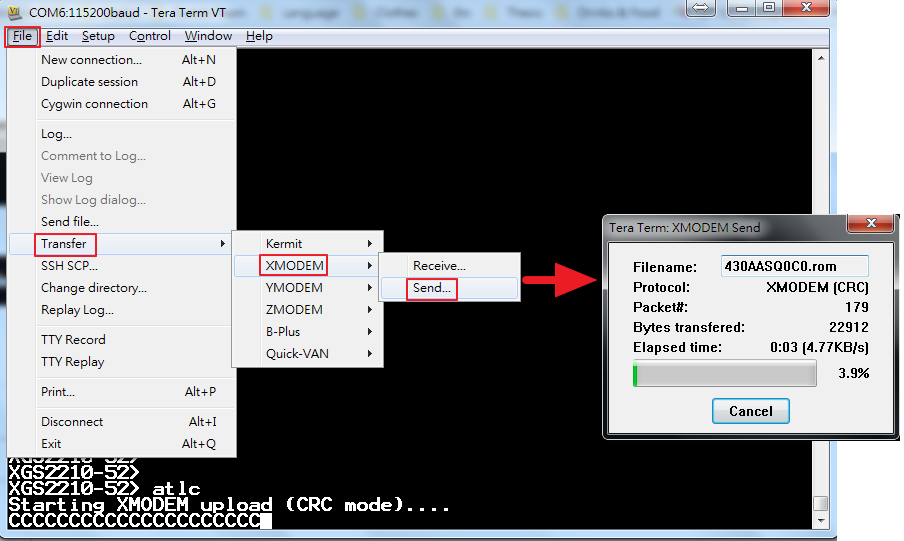
5. Input the command "atlc" to upload ROM file.
Figure 13

6. Browse and choose the ROM file in the firmware file then upload the ROM.
Figure 14 File > Transfer > XMODEM > Send

7. After the ROM file is successfully uploaded then input the command "atgo" to continuously boot up the device.
Please remember that the baud rate will be changed to 9600.

8. The device is ready to use. Username: admin. Password: 1234.

Jason
0
Categories
- All Categories
- 442 Beta Program
- 2.9K Nebula
- 219 Nebula Ideas
- 127 Nebula Status and Incidents
- 6.5K Security
- 586 USG FLEX H Series
- 344 Security Ideas
- 1.7K Switch
- 84 Switch Ideas
- 1.4K Wireless
- 52 Wireless Ideas
- 7K Consumer Product
- 297 Service & License
- 476 News and Release
- 91 Security Advisories
- 31 Education Center
- 10 [Campaign] Zyxel Network Detective
- 4.8K FAQ
- 34 Documents
- 87 About Community
- 102 Security Highlight