[NEBULA] How to configure Nebula Cloud Authentication with captive portal?

 Zyxel Employee

Nebula Cloud Solution provides the option to let users authenticate into wireless networks using sign-on with Nebula cloud authentication with Nebula Cloud Authentication option, offering the possibility to create and storage account information on the cloud, being efficient by reducing the time and effort that requires to set-up a radius server.
Pre-requisites: An SSID network needs to be configured in order to apply sign-on with Nebula cloud authentication for the clients connecting to the wireless network.
You can enable Sign-on with Nebula cloud authentication at Configure > Access point > SSID advanced settings.
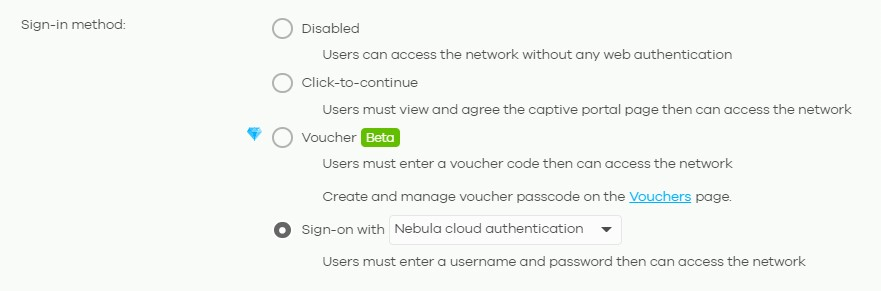
You can adjust the settings base on your application in Captive portal advance setting.
When choosing Sign-on with Nebula cloud authentication, the wall garden will be enabled as well. You can add the website into the wall garden list that the customer can access without passing the authentication. *1

Self-registration: default is Allow users to create accounts with manual authorized. Self-registered users must authorize by clicking the confirmation link in the received email. Then after network administrator give the account privilege, user can sing-on with manual created account. You can select Allow users to create accounts with auto authorized that users could sign-on right after self-registered. The left type is Don’t allow users to create account.

Simultaneous login limit: This can restrict the login devices at a time. It could be one device or multiple devices. Click Model list to know about the number can set here.

Strict Policy: Allow HTTPs traffic without sign-on or not.

Reauth time: The agreement page will pop out again when the lease time is expired. We can choose the follow site-wide setting*2 or assign a definite time for it.

NCAS disconnect behavior: When Nebula Cloud Authentication Server is unreachable, which mode would you want to implement.

2. Create account information to login for Nebula Cloud Authentication
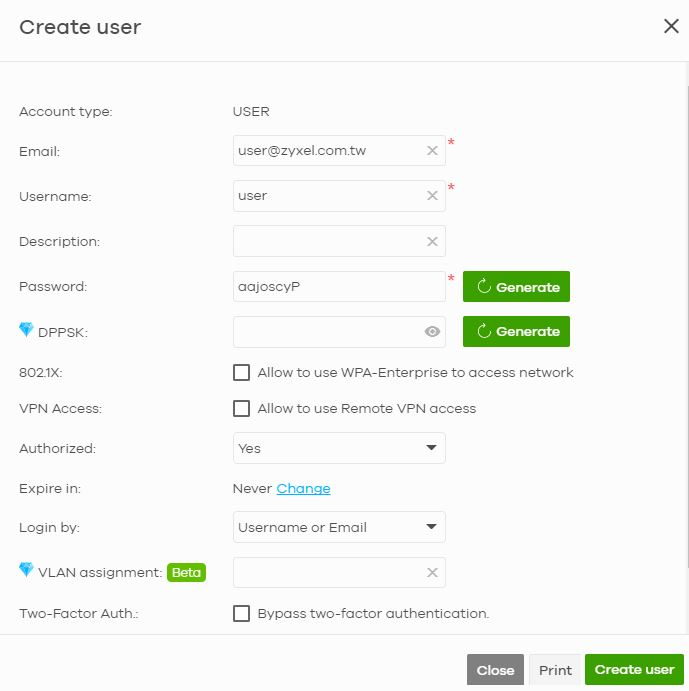
In order to use Nebula cloud authentication option, it is necessary to define the account authentication information in Configure> Cloud authentication
a) Select User, used for captive portal.
b) Create the account information by clicking +Add button.

c) A new window will be displayed in which we need to input account information as Description, Email, a password (or click Generate button), email the password to account, change the Authorized value from Not authorized to All sites or Specified sites and define the minutes in which the account will expire after creating the entry or select Never (default value).
d) Once the information is defined, proceed to click Create User button and Save the configuration.
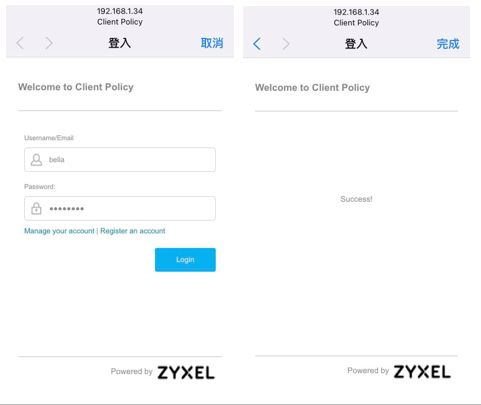
4. Connect to SSID and enter the account information to authenticate
Select the SSID network that has been configured to authenticate using Nebula Cloud Authentication.
The captive portal for client to sign on will be loaded after client connect to the SSID.
Input the email/username in Username/Email text box, the password in Password field, and click Login. Client can surf the internet after Success! information pops.
Note.
1. About the Walled garden, One IP address/domain in one line to specify your walled garden. Example: *.zyxel.com, www.zyxel.com, 192.168.1.0/24
2. Site-wide reauthentication time: Configure > Site settings > Captive portal reauthentication > For cloud authentication users.
3. Captive portal can be used without license. It should be noted that the Captive portal SSID will only broadcast on the AP model which supported Captive portal feature. You can refer to Nebula > Help > Device function table for supported model list.
Categories
- All Categories
- 442 Beta Program
- 3K Nebula
- 232 Nebula Ideas
- 131 Nebula Status and Incidents
- 6.7K Security
- 684 USG FLEX H Series
- 362 Security Ideas
- 1.8K Switch
- 87 Switch Ideas
- 1.4K Wireless
- 56 Wireless Ideas
- 7.1K Consumer Product
- 310 Service & License
- 504 News and Release
- 97 Security Advisories
- 31 Education Center
- 10 [Campaign] Zyxel Network Detective
- 5.1K FAQ
- 34 Documents
- 89 About Community
- 112 Security Highlight