How to Configure Captive Portal Redirect on Controller?
 Zyxel Employee


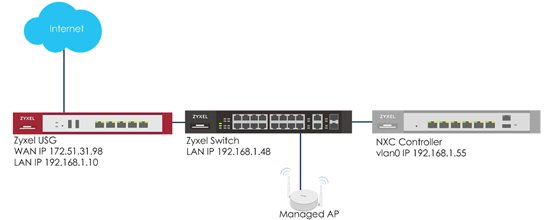
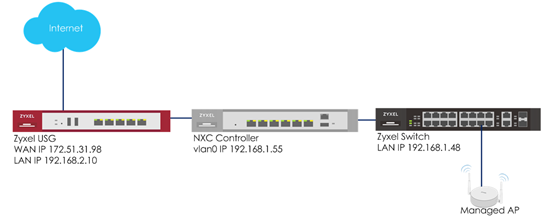
The example instructs how to set up captive portal redirect on the controller. A captive portal can intercepts network traffic, according to the authentication policies, until the user authenticates his or her connection, usually through a specifically designated login web page. Typically, you often find captive portal pages in public hotspots. There are two kinds of the topologies for captive portal redirect on the controller: one is to set USG as the gateway; the other is to set NXC controller as the gateway. The configurations of these two kinds of topologies show in below procedures.
a. Captive portal redirect on controller (USG is gateway)
b. Captive portal redirect on controller (NXC is gateway)
Configure Authentication Method Setting
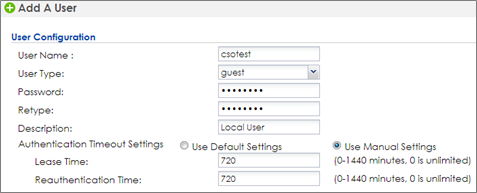
1 Go to CONFIGURATION > Object > User/Group, click add to create a new user ID and password. Stations can log in captive portal to access the Internet via this account. Enter the User Name as login ID for captive portal and User Type is guest. Enter the Password as the login password. The default of Authentication Timeout Setting is 1440 minutes, and usually it’s shorter for guests. Select to Use Manual Settings to set Lease Time and Reauthentication Time. Click OK to save.
2 Go to CONFIGURATION > Object > Auth. Method, click add to create an authentication method. Enter the Name of this authentication method and select to local in the Method List.
Configure Captive Portal
1 Go to CONFIGURATION > Object > Address > Address, click add to create an address range which needs to do captive portal authentication before accessing to the Internet. Enter profile Name and change Address Type to RANGE. In this example, the IP range for guest is 192.168.1.100 to 192.168.1.200 on DHCP server (USG). Click OK to save.
2 Go to CONFIGURATION > Captive Portal > Redirect on Controller > Authentication Policy Rule, click add to create a policy rule for stations which get an IP range from 192.168.1.100 to 192.168.1.200.
In General Settings, check Enable Policy and enter the Description of this policy.
In User Auth Policy, change Source Address to CPtest and Authentication is required. Check Force User Authentication, and change the Authentication Method to localtest. Click OK to save.
3 If you want to use the domain name instead of an IP address, you can set it in the Authentication Type. (If you don’t have FQDN, please skip this step)
4 Go to CONFIGURATION > System > WWW and enable Redirect HTTP to HTTPS. Click Apply to apply the settings.
5 Go to CONFIGURATION > Captive Portal > Captive Portal, check Enable Captive Portal. Click Apply to apply the settings.
Configure AP Profile when USG is the Gateway
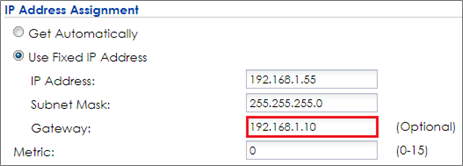
1 To make sure the USG is the gateway for vlan0 interface which is for client accessing the Internet, go to CONFIGURATION > Network > Interface > VLAN > vlan0 > Edit, enter USG’s IP in Gateway. Click OK to apply settings.
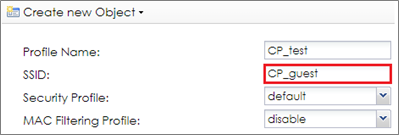
2 Go to CONFIGURATION > Object > AP Profile > SSID > SSID List, click Add to add a SSID for captive portal. Key in the SSID to CP_guest, and change Security Profile to default which sets none security. Change Forwarding Mode to Tunnel Mode and click OK to save.
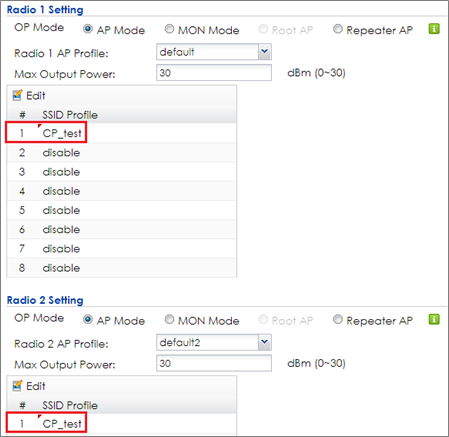
3 Go to CONFIGURATION > Wireless > AP Management > AP Group, select the default AP profile and edit. Select #1 to CP_test which created in step2. Click Override Member AP Setting to apply the SSID to AP and click Yes in the pop-up window. Click OK.
4 Logout from NXC controller.
Configure AP Profile when NXC is the Gateway
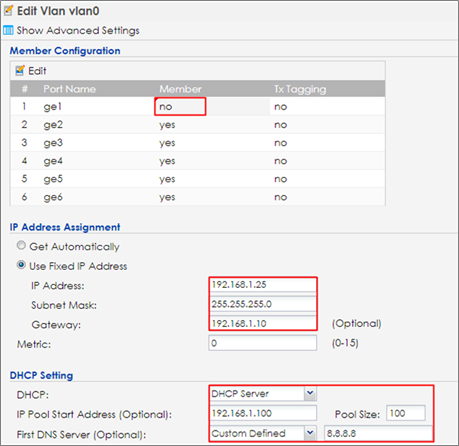
1 Make sure the NXC is the gateway for vlan0 interface which is the captive portal and stations need to connect to. Go to CONFIGURATION > Network > Interface > VLAN > vlan0 > Edit, select no in Member for ge1 and enter the NXC’s IP in Gateway. Enable DHCP server and set the IP from 192.168.1.100 to 192.168.1.200 (IP pool 100). The Default Router is vlan0. Click OK to apply settings
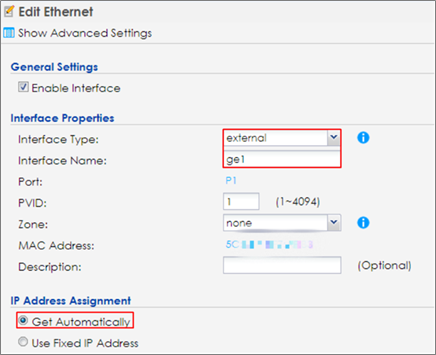
2 Go to CONFIGURATION > Network > Interface > Ethernet, click ge1 and then click Edit to make ge1 as the external interface for connecting with the Internet. Change Interface Type to external and IP Address Assignment is Get Automatically. Click OK to save.
3 Go to CONFIGURATION > Network > Routing > Policy Route, and click Add to add a routing rule for outgoing traffic. Click Show Advanced Settings. Check Enable in Configuration. Select Interface in Incoming and select to vlan0 in Please select one member. Change Type to Interface and select Interface ge1. Change Source Network Address Translation to outgoing-interface. Click OK.
4 Go to CONFIGURATION > Object > AP Profile > SSID > SSID List, and click Add to add a SSID for captive portal. Key in the SSID to CP_guest, and change Security Profile to default which sets none security. Click OK to save.
5 Go to CONFIGURATION > Wireless > AP Management > AP Group, and click default to Edit. Change #1 to CP_test which is created in step2. Click Override Member AP Setting to apply the SSID to AP and click Yes in the pop-up window. Click OK
Comments
-
Test the Result
1 Connect to SSID CP_guest from the computer. After the connection is successfully established, check if the IP is in the range from 192.168.1.100 to 192.168.1.200, and the gateway is NXC’s IP.
2 Open a browser and visit a website it after the computer connects to the AP successfully. The browser redirects to the captive portal page and needs to enter the username and password for authentication before accessing the Internet.
3 If you use redirect by FQDN, the website address shows the domain name you set in captive portal authentication Type.
4 After entering the username and password correctly, the connected station is able to access the Internet now. There is also a pop-window to show the detail information of the renew time and re-authentication time after authentication succeed.
What Could Go Wrong
1 The DNS MUST be set in the DHCP setting, or the captive portal might fail to redirect because NXC controller is not able to know the correct IP address of the website which stations access to.
2 The captive portal fails to redirect the webpage if the station logs in to the NXC controller before and does not logout.
3 When USG is the gateway, the Forwarding Mode MUST be Tunnel mode to make sure the traffic from AP goes to NXC controller.
4 If the user enters an incorrect username or password, there is a login failure webpage. Please use the correct username and password to log in again.
5 When using the NXC2500 as the controller, the uplink port MUST be ge1.
0
Categories
- All Categories
- 442 Beta Program
- 2.9K Nebula
- 217 Nebula Ideas
- 127 Nebula Status and Incidents
- 6.5K Security
- 574 USG FLEX H Series
- 344 Security Ideas
- 1.7K Switch
- 84 Switch Ideas
- 1.4K Wireless
- 52 Wireless Ideas
- 6.9K Consumer Product
- 297 Service & License
- 473 News and Release
- 90 Security Advisories
- 31 Education Center
- 10 [Campaign] Zyxel Network Detective
- 4.8K FAQ
- 34 Documents
- 87 About Community
- 102 Security Highlight
